If you do business on the Internet, you already know that you need a website. And of course, it’s a prerequisite for ecommerce companies. With online shops, stores can reach a global audience and operate around the clock — things that wouldn’t have been considered inconceivable not all that long ago.
It’s a booming market, too. According to Insider Intelligence, revenue from global ecommerce is projected to hit $8.1 trillion by 2026.
One of the most popular ways to get the best ecommerce website up and running is WordPress.
Using WordPress for all types of ecommerce websites is a sensible choice since the content management system (CMS) serves as a flexible platform for building any kind of website you want, including fully functional online stores. And WordPress with WooCommerce is a super effective duo. But more on that later.
If you want to know all that goes into setting up a successful ecommerce site using WordPress and WooCommerce, read on.
Creating a WordPress ecommerce website might seem daunting, but it’s a straightforward process when presented as a series of doable steps.
Follow along with our step by step tutorial to learn how to choose a domain name, set up WordPress, configure a proprietary SaaS ecommerce solution, and walk away with a successful ecommerce store that can fall in line with some of the most impressive ecommerce sites:
Step 1: Choose a Domain Name
Your first order of business is to secure a domain name for your WordPress ecommerce websites. A domain name is an online address where people can find your store and potentially become customers. It should be relevant to your business, easy for site owners to remember, and concise.
You can purchase a domain name from domain registrars like GoDaddy, Namecheap, or Bluehost. The average cost of a domain name is around $10-$12 per year and can often be bundled with your WordPress hosting plan, no matter the type of ecommerce store you wish to create.
Which actually takes us to our next step.
Step 2: Purchase Hosting
If your domain name is your website’s address, then the WordPress hosting plan you choose serves as its house. Your web hosting server is where all your website files are stored.
Then when someone accesses your site’s web address, they’ll be taken to your live website, which is served up by the host’s server.
There are many secure hosting providers to choose from, but for a WordPress ecommerce solution, it’s recommended to choose a web hosting provider that offers features store owners need like:
- A free SSL certificate to protect customer information
- Dedicated WordPress and woocommerce hosting for optimal performance
- 24/7 support so if an issue arises, you won’t miss out on online sales
- A 99% uptime guarantee so you, again, won’t lose prospects
- Automatic backups to protect your data
- Built-in security
Some popular WordPress hosts include Nexcess, Bluehost, and SiteGround, all of which offer plans for hosting stores.
Step 3: Install WordPress
Your next task is to get WordPress installed on your web host. In most circumstances, installing WordPress is a straightforward process that takes less than five minutes to complete.
And many web hosts offer tools to automatically install WordPress for you with just “one click.”
For instance, if you have Bluehost as your web hosting provider, all you need to do is log into your Bluehost control panel and then click Hosting > Add Site.

From there, you can click the Install WordPress link under Choose a site type then click Continue.

All you have to do after that is choose a site title, input your domain name, click Continue, and wait for WordPress to install automatically.
From there, you’ll be prompted to log Into WordPress, at which time you’ll need to create a username and password for your new WordPress installation.
Step 4: Install the Kadence WordPress Theme
To really ensure you can use WordPress for ecommerce, you’ll need to add a suitable WooCommerce theme that supports ecommerce features. There are thousands of WordPress themes available on the free theme directory. But for the purposes of this full tutorial, we’ll be using the Kadence theme.
It’s a versatile, highly-customizable WordPress theme that supports ecommerce as a WooCommerce theme as well — and looks good while doing it.
To install Kadence, all you need to do is go to your WordPress dashboard and navigate to Appearance > Themes.

Then click Add New and type in “Kadence” in the search field. Once the search results are presented, click the Install button next to the Kadence theme and wait for the process to finish.

Once completed, click Activate.

Then you can go about customizing the starter template website to suit your purposes. To do this, go to Appearance > Customize. Here you can make a variety of changes to your website design and change this basic website framework to something that compares to other websites and top ecommerce performers.
First, go to Homepage Settings and select how you want your homepage to appear. Since you’re building a store, select A static page under Your homepage displays. Then make sure the Homepage is set to Home and the Posts page is set to Blog.

From there, go down the list of options and make customizations as you see fit. Change the colors and fonts and make a beautiful ecommerce experience:

Customize the site’s header, footer, and general layout options, select whether or not you want to use a mega menu, and more. Click through the options and adjust the design until you’re happy with how it looks. Then save your changes.
Next, you’ll need to create the essential pages necessary for your store. Kadence will have automatically created a Home and Posts page.

To add more. Go to Pages > Add New and create new pages for each of the following:
- About Us: Talk about your store, how it got started, what you offer, and your company’s philosophy. Include any other relevant business details as well.
- Contact Us: List multiple contact methods, including any customer support that you’ll be providing.
The last page you’ll need is a Shop page, but this is automatically generated by the WooCommerce plugin, which we’ll discuss in the next step. Kadence is one of many suitable WooCommerce themes that is optimized for the plugin, so that’ll save you some configuration steps later.
Since WordPress is primarily a platform for content, you can add content to the main pages of your site so that they have the structure, appearance, and verbiage you wish.
Be sure to click Publish on each page when you’re done editing. They won’t be visible on your live site until you decide to publish your site.
Step 5: Install WooCommerce
To really get your store up and running, you’ll need a proprietary ecommerce platform to support people buying your products. There are several ecommerce platforms out there but we recommend WooCommerce. A ton of ecommerce sites use it — and for good reason.
Now, WooCommerce or Shopify both are solid, but if you’re opting for a WordPress site, most ecommerce platforms aren’t compatible so WooCommerce is the way to go. Even so, Ecwid is another one of the best ecommerce website builders and serves as one of many WooCommerce alternatives for building WordPress ecommerce sites.
To install the WooCommerce plugin next. It’s the most popular of the wordpress ecommerce plugins and offers all the features you need to get started.
To install this WordPress plugin, go to Plugins > Add New then search for “WooCommerce.” Once the search results load, click Install Now next to WooCommerce.

Wait for installation to complete then click Activate.

From here, you’ll be taken through the WooCommerce Setup Wizard, which will walk you through the entire setup process for configuring the plugin for managing your store and making the most of WooCommerce functionality.
First, you’ll be prompted to answer questions about your store, including its location and currency accepted. Then you’ll need to select what kinds of products you plan on selling, i.e. physical, digital, or a combination of the two.
Next up, you’ll be guided through a series of payment questions. It’ll automatically install WooCommerce Payments and then configure general options, what payment gateways you’ll accept, credit card fees, and if you will accept Express checkouts for your online selling efforts.

Enable or disable other options as they pertain to your store as well, including transaction preferences, how frequently you’d prefer to receive deposits and fraud protection. Be sure to save your changes when you’re done.
Then go to the Shipping tab and add the shipping zones you’d like to ship to if you’re selling physical products and set the shipping rates.
Next, tackle the Tax tab and select the options that suit your store.

Finish out the setup wizard by selecting your sales channels and personalizing your store by adding a logo, importing sample products, and setting a store notice.

Congrats! You have a WooCommerce website now!
Note: there are many free WooCommerce plugins and extensions as well as those that are compatible with WooCommerce, so be sure to browse through the available options and add those that suit your needs. There are both free offerings and WooCommerce premium extensions available, so find something that suits the budget you’ve set for your online storefront.
Step 6: Add Products to Your Store
With all the essentials put in place, you can start adding products to your online sales presence.
To set up products in dedicated ecommerce powerhouses like WooCommerce, go to Products > Add New in your WordPress dashboard. Give your product a name just as you would a page or post title.

From there, the process to setup WooCommerce products is fairly straightforward.
Fill in the product description next. This can be as brief or as in-depth as you’d like.
Scroll down to the Product short description section and fill in a shorter description of your item.

But the most important part to attend to when adding products in WooCommerce is the Product data section.

Next to Product data, click the dropdown menu. You have several options to choose from here, including:
- Simple product: This refers to single products you’re selling that would each have a set price and SKU.
- Grouped product: This option is ideal for grouping together a set of simple products that are related in some way. So, you might offer items individually as simple products but then group them together as a package or set and sell that set as a grouped product with a special price and SKU.
- External/affiliate product: These are products that you’re not actually selling yourself; rather, they’re sold from another website and you receive a commission for them. This can include things like print on demand products if you decide to dropship with WooCommerce or affiliate products.
- Variable product: These are products that have options attached to them like color or size. Each variable can have a different price, stock availability, and SKU number.
After selecting the product type, you can fill in its data. For instance, if you’re adding a simple product, you would need to fill in its price, sale price, tax status, and tax class.

However, if you’re offering a variable product, you’d need to go to the Attributes tab first and set what attributes your products should have.

Then go back to the General tab and set the tax status and tax class for it, where you can set the tax rates.

Next, click the Inventory tab to access all the inventory management features. Give your product an SKU, select stock management options, establish the stock status, and select order limitations.

Your next step is to scroll down to the Product image section. Add a photo that you want to use as the primary image for your product.
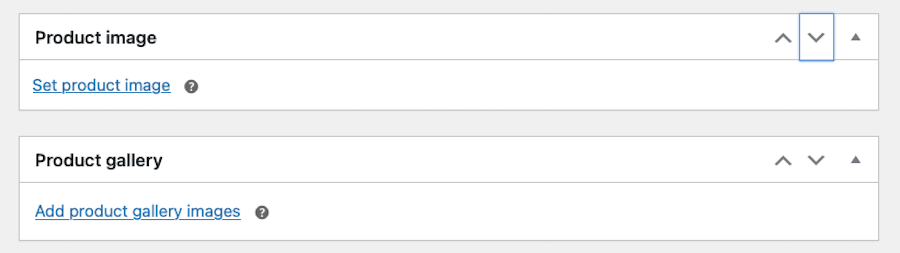
Then scroll to the Product Gallery section and add more images that more fully illustrate what the product looks like, its features, variations available, how it can be used, and so forth.
On the right-hand side of the screen, set a category for this product and write out any tags that are appropriate.
Once you’re done making changes, click Publish to make the product live in your store.
Step 7: Enhance Your Ecommerce Store
Now that you’ve created your basic site, you can improve its full ecommerce functionality and user experience by adding extra features. This includes installing important WordPress plugins, setting up an email optin form, and integrating social media.
Install Important WordPress Plugins
First, a few plugin suggestions:

Rank Math is a solid choice for managing search engine optimization (SEO) on your website and is excellent for ecommerce. In case you’re unfamiliar with it, SEO is a practice that can help people find your website more readily in search results. Greater search engine visibility can boost your sales over time.

For security, you really can’t go wrong with Wordfence Security. Every site owner needs to think about wordpress security, and this plugin makes it much easier to manage.
This plugin comes with a malware scanner, traffic monitoring, and a firewall for keeping your site’s data — including your customer’s personal information — safe. And if you need more tips, feel free to follow our wordpress security checklist .
Continuing on the plugin front, you should think about managing site backups, too. If something goes wrong, it’s imperative that you can back up from a clean site copy.

A top choice in this space is UpdraftPlus, which allows you to schedule backups automatically and have them saved to multiple external locations — like Dropbox or Google Drive — for added safety.
Configure Email Opt-in Form
A few other things to consider when setting up an ecommerce website on WordPress? Creating an email opt-in form to capture leads.
An email list is a powerful way to connect with prospects and engage with customers directly. You can send personalized offers, discounts, or coupons. You can send abandoned cart reminders, follow-up emails, and more.
You can actually learn from amazon, everyone’s favorite ecommerce website, and structure your welcome emails, transactional emails, and follow-ups similarly to their efforts.
There are so many options and you’d be missing out on a significant sales funnel without an opt-in form or email marketing list.

MailPoet is a great plugin for creating and managing email opt-in forms. And you should consider email marketing services like Mailchimp or AWeber as well.
Integrate Social Media
Lastly, don’t forget to fully integrate social media into your site as well. You can do this in a few ways. For instance, you can showcase your social feeds directly on your site using a plugin like Smash Balloon.

Or, you can make it easy for site visitors to share your content across social networks.
Step 8: Optimize Your Ecommerce Store
Running a successful ecommerce site requires speed. Not in the sense you need to upload products quickly. No, you need to ensure your website loads quickly. In fact, Google research shows that the longer it takes for a page to load, the more likely people are to abandon a website. Just a one-second delay in page response can result in a 7% reduction in conversions.
Website speed is not just about user experience, it also affects your site’s visibility. Google has introduced Core Web Vitals, which counts as a ranking factor for WordPress websites. So, the faster your website, the better your chances to get to the first page of Google search results and more likely it is you’ll have a high performance ecommerce store.
Keep in mind, you can change up your ecommerce site to exist outside the traditional WordPress framework as well. Many create headless ecommerce sites now, especially large ecommerce operations.
SEO is an important factor to consider as well. The better your SEO, the more visible your online store will be to potential customers.
There are a few ways you can ensure proper SEO — on top of installing an effective plugin:
- Keyword optimize your store’s content: Use relevant keywords throughout your site, especially in your product descriptions and blog posts.
- Meta Descriptions: These are brief summaries of your web pages that appear in search results. Make sure they are compelling and contain your main keywords.
- Image Alt Text: If an image doesn’t load, the alt text tells visitors what it contained. These descriptions are used by search engine crawlers to understand the content of the image as well.
- URL Structure: Keep your URLs short and keyword-rich.
- Internal Linking: Linking your blog posts, pages, and products together can help search engines better understand the relationships between your content. It also helps customers more readily find what they’re looking for.
Step 9: Master Ecommerce Store Management
The last step we need to discuss is store management. This involves things like order fulfillment, shipping, and customer service.
Order Management
Once a customer places an order, it shows up in the Orders section. You’ll be able to view all the details of the order, including the customer’s contact info and what items they ordered.
You can also update the status of the order from this screen, marking it as Processing, On Hold, or Completed.
Shipping
Taking care of shipping is important, too. As we already mentioned, you can configure your shipping settings by clicking WooCommerce > Settings > Shipping.

Under this menu, you can add shipping zones as well as multiple shipping methods for each zone. You can set up flat rate shipping, free shipping, or even local pickup depending on the needs of your business.
Then once you receive an order and arrange for shipping, you’ll need to actually fulfill the order. This involves packing the product, labeling it, and handing it over to your shipping carrier.
Depending on the scale of your ecommerce business, you might consider partnering with a fulfillment service.
Customer Service
But don’t forget customer service. After all, ensuring your customers have a positive experience can go a long way toward building a positive reputation for your shop.
Put a system in place to handle customer inquiries from the start. A chatbot or email ticketing system are both good options. WordPress plugins like LiveChat can help you set this up, too.

Successful ecommerce sites also have a set policy for processing returns and refunds. It doesn’t matter how good your products are, someone at some point will need to return a product. So make your policies on the matter clear and fair.
Finally, encourage your customers to leave reviews on your product pages. In a practical sense, this helps you get much-needed feedback on your products and store overall.
But having positive reviews on your products also sends a signal to potential shoppers that your products are worthwhile. A plugin like YITH WooCommerce Advanced Reviews makes it easier to capture and publish reviews on your products.

Remember, running a successful site involves continuous learning and adjustment. Keep an eye on your analytics, listen to your customers, and don’t be afraid to make changes when necessary.
With the right approach, your WordPress site can become a thriving online store.
Step 10: Launch Your Ecommerce Website
With all the steps above completed, all there is left to do is launch your site. To do this, go to the WordPress dashboard and click Publish Site in the top left corner.
You should take a look at how your WordPress ecommerce store looks once it’s live. Click around all the navigation and links. Ensure images load properly and that the site’s speed is where you’d like it to be.
Then send your site over to some trusted friends or colleagues and have them make a look. Incorporate any feedback you receive before properly marketing your new store. It’s much better to have a friend point out an issue than for a customer to happen upon it while online shopping.
Make an effort to keep an eye out for related commerce plugins in the coming months after launch as well. Plugins that provide more shipping options, WooCommerce point and reward programs, related ecommerce plugins, or any other extensions good for ecommerce are worth a look.
FAQs
Are You Ready to Launch Your WordPress Ecommerce Site?
You’ve made it to the end of our complete guide to setting up an online shop with WordPress. Well done! You hopefully have a solid understanding of how to set up WordPress, install all the necessary plugins you need, and customize and configure WooCommerce to bring the store of your dreams to life.
From installing a theme to adding new products, we’ve covered all the basics here, including how to offer multiple payment methods and provide excellent customer service. By keeping this process in mind, you’ll be well on your way to launching a successful WordPress ecommerce site in no time.
A parting word of advice? How ecommerce works is always changing. Stay updated with the latest trends and adapt your site accordingly.
With WordPress and WooCommerce, you have a flexible platform that can grow and evolve with your online business — no matter where the latest WordPress ecommerce development trends take you.
Good luck!