People don’t just search on Amazon for products.
Google Shopping is growing at an alarming rate. Accounting for 55% of Google search ad clicks in the US, Google Shopping is a huge traffic-driving source, ultimately increasing earning potential for online businesses. Google product ads work.
You can customize your ad content, set a budget and pricing that’s comfortable for you, and easily measure the impact of your ads with advanced reporting and performance tools.
In this guide, we will take you through all the steps of your Google Shopping Setup.
What is Google Shopping ads exactly?
Google Shopping ads are ads that are shown to people searching for the types of products you advertise. The shopping ads appear in the sponsored section of Google’s search engine results pages (SERPs) that include rich product information. Shopping ads on Google allow people to compare, and shop for products across different retailers also known as a Comparison Shopping Engine (CSE).
An Example of the Google Shopping Ads
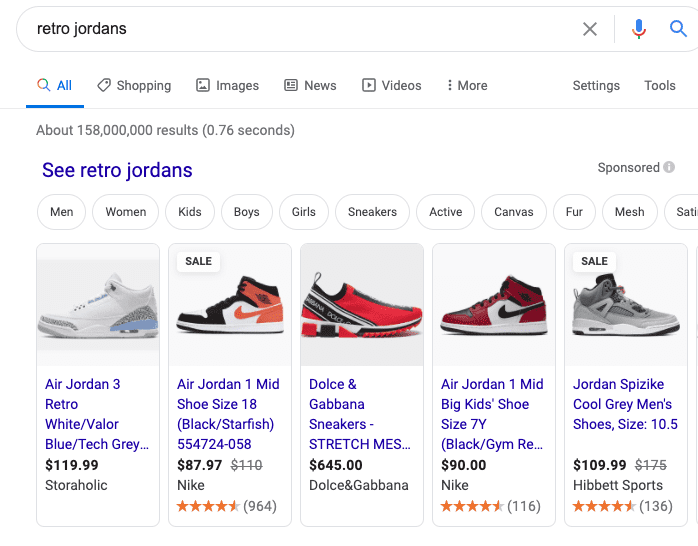
In the example image above, it shows product ads (formerly known as Product Listing Ads or PLAs) for the search query “retro jordans” at the top of the page in the sponsored section.
Each shopping ad consists of a product image, price, ratings, and the name of the merchant. To add your products, you’ll need to submit your product information using data attributes into your Merchant Center data feed. With eCommerce platforms such as Shopify, they make it easy for you by automatically syncing your products to Google Merchant Center using the Google Shopping app.
After you set up your Shopify store or ecommerce site, the next step is to get traffic.
Unlike traditional Google Ads SERP (search engine results page) ads, to be successful with Google Shopping eCommerce, advertisers need to take an SEO optimization-type approach. When creating your SERP Google Ads, you create campaigns, ad groups, descriptions, and images, all in line with your chosen keywords.
With Google Shopping, however, Google is the one who determines when and where your shopping listings are shown, triggered by your bids, your store, and your Shopping feeds. It’s fast becoming a popular marketing choice for eCommerce, with some studies proving that they result in as much as a 26% higher conversion rates for product listing than traditional search text ads.
So, what makes Google Shopping so successful? Three things play a part in Google Shopping success: feed creation and optimization, your bidding strategy, and campaign monitoring and optimization.
It’s no secret that the best place to learn Google Shopping Ads if from Google itself. But sometimes, our clients have a hard time figuring out exactly what they need to know about Google Ads. Plus, Google is notorious for wanting to get people to spend more than they should. Therefore, we’ve decided to put together a google shopping set up guide with steps on setting up google shopping for success.
Step 1: Creating Your Google Shopping Account
Opening Your Google Merchant Center
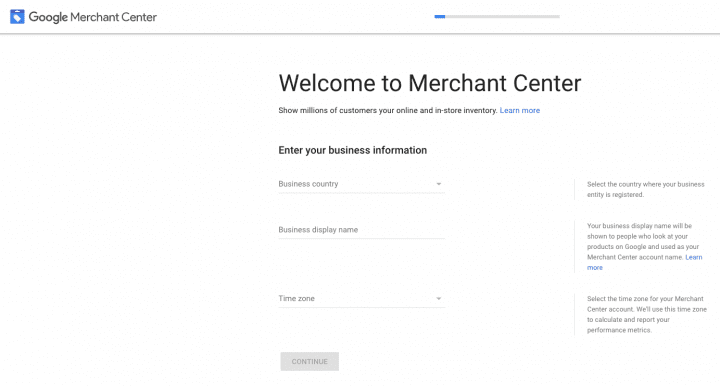
The very first step you need to make to be able to run Google Shopping campaigns is to open your Google Merchant Center. A Google Merchant Center is where your Google Shopping feed data is listed and how it populates. Visit www.google.com/merchants to open your Google Merchant Center and follow their setup steps, which include basic business information, term, and conditions review, and website verification.
Setting Up Your Tax and Shipping Rules
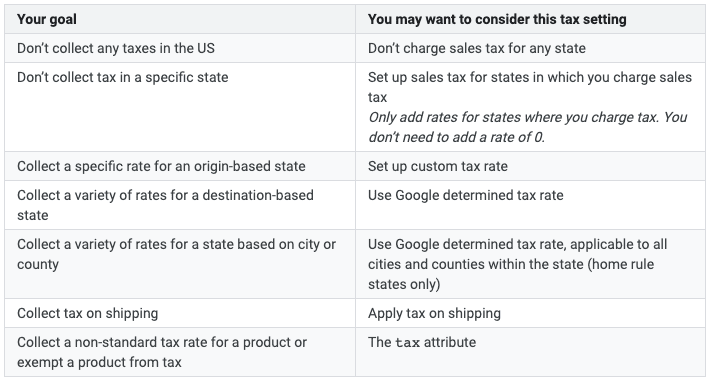
Your next step is to set up your tax and shipping rules, both of which are essential for running Google Shopping ads. To do this, you will go to the ‘general settings’ and either input your tax rates or, if you’re a US seller, input the states you’re trading in, and Google will do the rest. Here are Google’s US Tax guidelines:
Linking Your Google Ads Account
The next thing you will need to do is link your Google Ads account to your Merchant Center account so that you can run your first campaign. You can link these accounts through your Merchant Center dashboard by clicking on ‘Google Ads’ from your settings. You will need to ensure that both platforms have the same email address with Admin access and have your Google Ads ID ready to link accounts.
Setting Up Your Product Feed
To set up your product feed, you can either manually build it using Excel or, if you’re using top platforms, use apps, plugins, or extensions to link product feeds automatically.
Pro-Tip
Do an audit to ensure your shop’s backend product info is well-structured with keyworded product descriptions, structured titles, and good images before you import from your feeds.
You’re now ready to run your first Google Shopping Campaign.
Step 2: Creating Your First Google Shopping Campaign
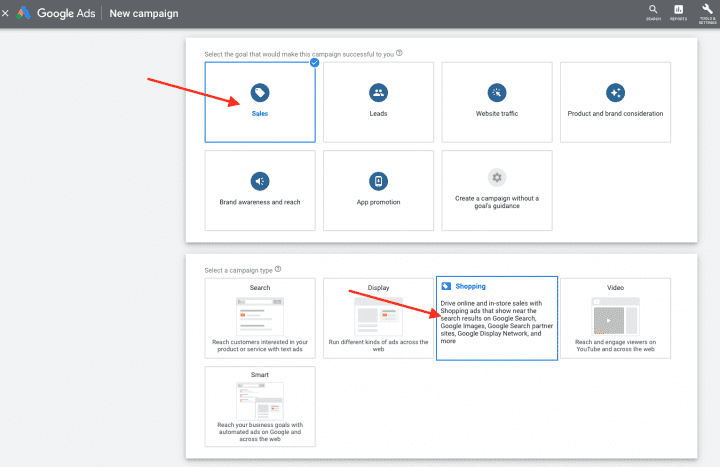
Before you go on
When creating a Google Shopping Campaign, you will need to link your Google Merchant Center account.

Note: It’s important to note here that Google Shopping Campaigns are country-specific, so you’ll have to set up campaigns per product for each location you’re selling in!
Choose a Campaign Subtype
Next, you’ll need to choose a campaign subtype. You can choose between the “Smart Shopping campaign,” which is automated, or “Standard Shopping campaign.” Use Smart Shopping if you want automated bidding and targeting to allow Google to show your ads across the Google Search Network, Display, YouTube, and Gmail. We recommend staying away from Smart Shopping and choosing the Standard Shopping campaign for more control.

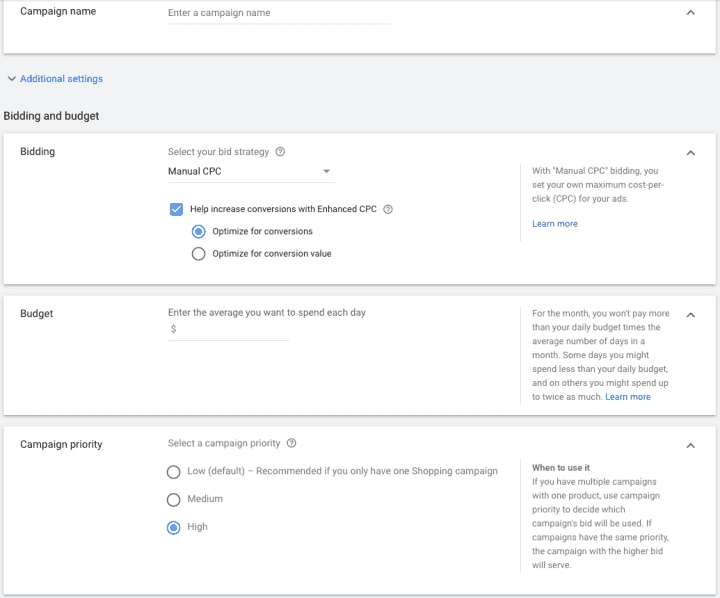
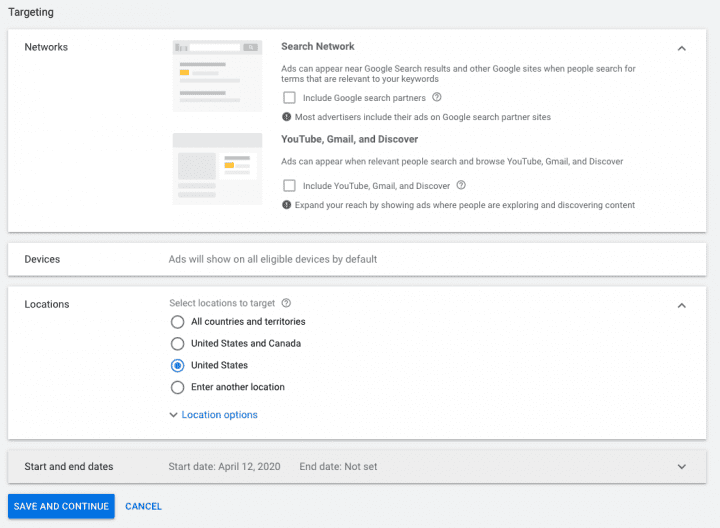
Choose Your Campaign Settings
Standard Shopping allows you to choose your products, bid strategy, budget, and targeting.
Choose Your Ad Group Type
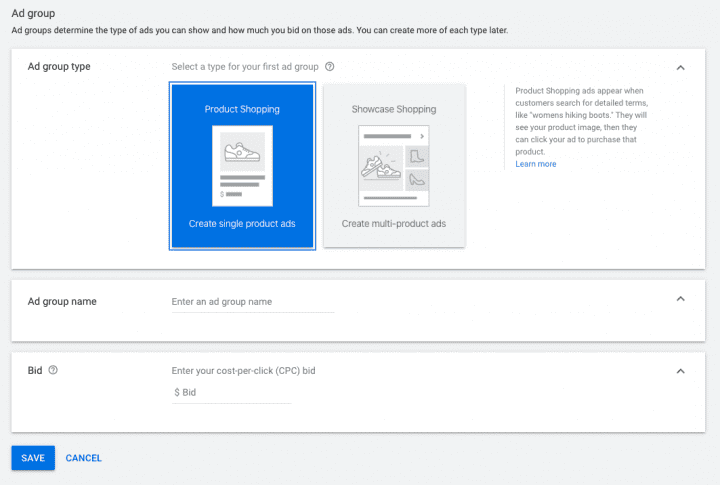
Next, you’ll need to set up your Ad group type, name, and bid.
Setting Up Product Groups for Easy Optimization
Just as we advise you do with any Google Ads campaign, when creating your first Google Shopping campaign, you want to start with well-structured, segmented groups. This will ensure that optimization, vital for Google Ads success, is easier to manage. Unlike SERP ads, Google Shopping campaigns only allow for one AdGroup per campaign. However, you can divide this ad group down further into product groups.
You can set this up by clicking your Google Shopping Ad Group name, where you can then divide your products into groups based on category, brand, product type, and custom labels. Here’s a quick breakdown.
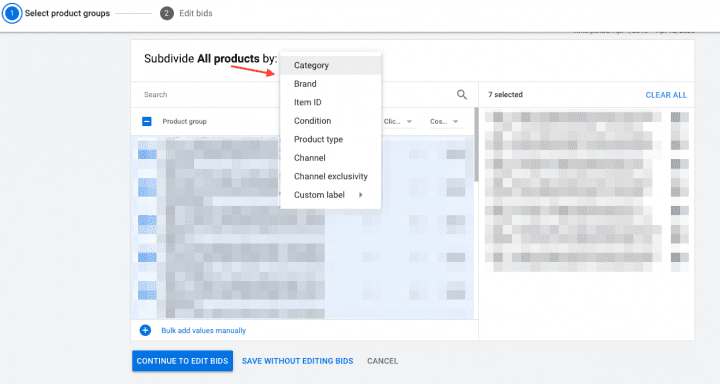
Category Product Groups
Category product groups are our least favorite of the four. This is where you can divide your products into Product Categories. The issue with choosing this product group is that within one category, you can have a wide range of different products. Therefore this doesn’t always provide a segmented structure for better optimization.
Brand Product Groups
Another way you can subdivide and group your products is by brand. This is where different products from one brand name are grouped together. If you’re selling all unique products by your brand, this wouldn’t be an effective way to subdivide your products. However, if you’re selling an array of products made by different brands, this will help your group by brand name and then assess metrics per brand.
Product Type Product Groups
This Google Shopping AdGroup subgroup is where you group products based on their type. This is the best way to group and segment your products, as it based on the taxonomy of your site and will be much easier to optimize.
Custom Labels Product Groups
Lastly, you can subdivide your products based on your labels such as ‘Most Popular,’ ‘Workout Clothes,’ ‘Back to School,’ ‘Christmas Gifts,’ or any other groups you feel would be worthwhile. You get up to five different custom levels you can choose from and is a great way to group seasonal products so that you can make quick bid adjustments to products that will be more popular for different seasonal events.
Pro-Tip: Negative Keywords
As we mentioned, keywords don’t get triggered when your product ads show like traditional ads; however, you can add negative keywords to each of your product groups to have some control over when your ads are not shown. For example, if you have a ‘silver earring’ product group, by adding ‘gold earrings’ as a negative keyword, you can eliminate the chance of uninterested shoppers seeing your product listings and affecting your ad stats.
Once your groups are in place for your campaign, it’s time to set your delivery and bids.
Google Shopping Campaign Bids
Like with any PPC campaign, you want to look at your product price, your profit margin, and average conversion rates to find a budget that ensures you’re getting sales for your spending.
When setting up your first campaign, you will want to start your bids for each group a little lower than what your bids are at for your traditional search campaigns, and then tweak up or down as the impressions and CTR (click-through rate) data comes in.
You want to set budgets low at first so that you have room to grow and scale-up successful campaigns. Here are some pro-Google Shopping bid tips to get you started:
- Bid higher in high-value/traffic regions and lower in low-value/traffic regions with geographic bid modifiers.
- Bids can either be accelerated or standard. You want to start with accelerated to ensure quicker product/search matching and faster access to optimization data.
- When setting your bids for ‘Everything Else’ product groups, aim lower than your named groups to ensure product data and traffic in that feed go to that specific product.
- Get remarkable insights from Search Impression Share metrics to see which product groups have good potential for growth.
- Start with mobile ads before adding desktop shopping ads to find the optimal placement for you.
- As Shopping ad bids differ from traditional search bids in that you bid per product or product group, you want to start with a bid between $0.10 and $0.85, depending on the amount of competition you have.
Beginner Hack: If you’re new to using Google Ads, start with a small product data feed of your current best-sellers or a few of your products with the highest profit margins, to get a feel of how they work and how to optimize before scaling up.
Step 3: Optimizing Your Google Shopping Campaigns
Like with any PPC campaign, dynamic or otherwise, the real secret to Google Shopping campaign success is in the optimization. In full, Google shopping success comes down to three critical factors: feed creation and optimization, your bidding strategy, and monitoring and optimization. The first two factors we discussed above, but regarding monitoring and optimization, however, we’re just getting started. The first step into proper optimization and monitoring is in setting up and linking your Google Analytics Account.
Setting Up & Linking Your Google Analytics Account
The three things you need to do to ensure you have access to the data you need to optimize for more sales are: linking Google Analytics to Google Ads, setting up conversion tracking, and accessing the right reports. Here’s a short how-to for all three.
How to Link Google Analytics to Google Accounts
- Sign in to your Google Analytics account
- Click on ‘Admin’ and navigate to the property you want to link
- Click Google Ads Linking in the property column
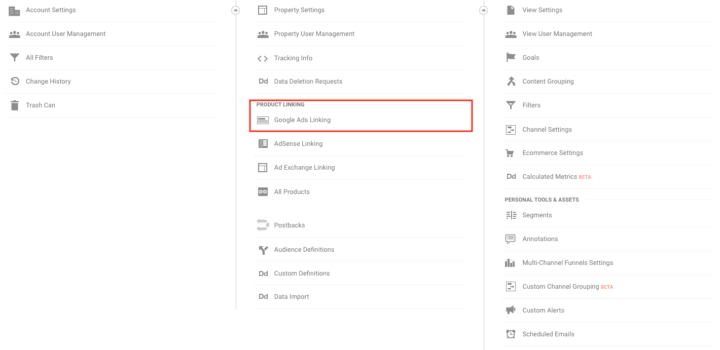
- Click ‘+ NEW LINK GROUP’
- After selecting relevant Google Ads account, click’ Continue’
How to Set Up Conversion Tracking
This is done either by using an eCommerce platform app or manually putting code on your website. The easiest way to do this is to go through Google’s conversion setup wizard.
How to Access the Right Reports
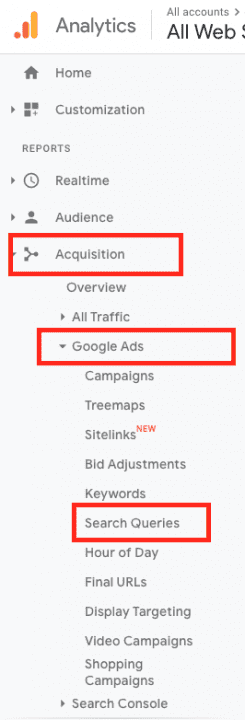
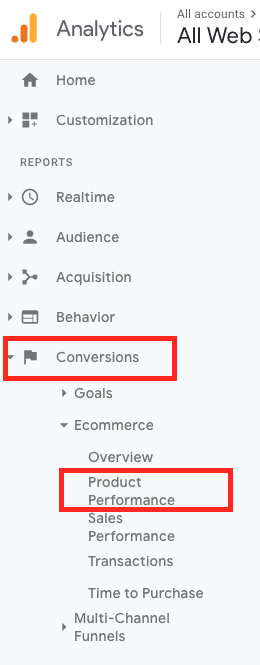
Once you’ve linked all your accounts and have started running the first campaigns, it’s time to look at the data for optimization. The two main reports you should be monitoring are Search Query and Product Performance Report Reports.
You can set up these reports directly in your analytics account through your dashboard.
Search Query Report:
Product Performance Report:
Step 4: Maintaining Google Shopping Feeds for Optimization
Maintaining your Google Shopping Product Feeds is essential to the optimization and success of your Google advertising campaigns. If your feed info is not accurate, Google will not show your ads.
Setting up and keeping your feed well-maintained ensures you show up in the right searches, and the key to optimization and management is to ensure you have set them up correctly from the get-go.
Say you’re running ads and find that your products result in high impressions but a low CTR. You know by the high impressions that Google finds your products relative; however, the lack of clicks tells you one of three things: either your images aren’t good, your titles aren’t enticing, or the most likely cause – your product price isn’t on point.
Here’s a breakdown of tips for each aspect of your feeds product information data you should be maintaining and A/B testing for maximum optimization.
Product Title
Your product titles should include your main keyword or phrases, your product name, model numbers, and be a maximum of 150 characters. You want your descriptions to be as detailed and clear as possible. For example, green cotton tennis socks. Ultimately your title is, besides your photo, the biggest drawcard for potential shoppers and can make or break your campaign.
Product Descriptions
Your product descriptions not only have to be accurate and concise but should include your most relevant keywords. If you manually loaded your product descriptions, you will ensure that they are checked and updated accordingly.
Product Images
Google requires white background images for Google Shopping campaigns and that your thumbnail is visible. Try A/B testing two or three images until you find the one that brings in the most “interested” clicks.
Pro-Tip:
Use Google’s Ad Preview and Diagnostics Tool to compare how your product photos compare to your competitors’.
Product Category
Google has over 6k different categories and subcategories you can assign your products. It’s important to ensure you choose the category as close to the product as you can, and we would advise reviewing Google’s full taxonomy list – which you can download here.
Product Type
Although not required, including a product type is particularly important for those whose products don’t fit into Google’s categories 100%. If your site’s taxonomy is on point, you can cut-and-paste your bread crumbs into the feed’s product type field. For example: clothing > women > shorts > denim shorts.
Price
As we mentioned, campaigns will be run for each country separately, and therefore you need to not only ensure the correct price is showing, but that it is in the right currency.
Step 5: Optimize Your Product Listings Quality Score
The quality of your product listings for Google Shopping Campaigns is determined by your expected or current CTR, the relevance of your ad, and your URL or product landing page experience. Make sure your product feed information is accurate to ensure your ads are always relevant. You need to ensure that your destination product page URLs are live and without 404 errors, as well as providing the product description and titles match the content of the product pages you’re sending them to when they click.
For instance, if your product has a high CTR but your conversions are low, not only is this a sign to Google that your product listings may not be relevant, but it also means your ROIs are going to be in the tank. Have a look at your competitors’ product pages; are they offering free shipping, guarantees, discounts, or any other incentives that you aren’t?
Pro-Tip:
As Google takes your ad history associated with your Product IDs into consideration, when you’re optimizing, you want to ensure that you keep product IDs of high-performing ads alone. If you want to ‘erase’ the performance of low-performing products, changing Product IDs will reset your product scores.
Step 6: Bid Optimization
As we mentioned previously, you want to start your bids low and then bump up good performers 1-3 times a week until reaching your ROIs. Weekly monitoring and tweaking are needed to ensure you keep your performing ads at their peak. So what are the signs that your bids are either too high or too low?
If you find your impressions are low, this is a clear sign that either your product feed information isn’t clear or more likely, your bids are too low. In these cases, we suggest you go over your titles, categories, and descriptions, etc., and then raise bids slightly to confirm that your bids – not your feeds – are the reason for your low impressions.
The issues with making dramatic bid changes to product groups that have lots of products include. Although some products in the group will have high competition, which ensures that bid increases help ad performance, big product groups may also include low-competition products, which would result in paying more for listings without improving your results.
With Google shopping, it’s imperative that your optimization and bid changes are done in tiny increments and shouldn’t be dramatically increasing or decreasing your bids by more than 20%. Instead, make small adjustments and delete those unprofitable products from groups altogether.
Tools and Apps
I’ve always been a fan of using Google Ads interface directly, but there are some cool software tools you can use:
Final Thoughts
To ensure max chances of Google Shopping campaign success, it comes down to your feed creation and maintenance, your bidding, ad monitoring, and strategy. The trick to their success, like with Google Ads, is A/B testing to finds the best combination of information, image, title, bid, and then to monitor and tweak your ads continuously to ensure you’re getting the most clicks and conversions for your buck.
Yes, your ads are shown dynamically, and they have positive ROIs, but they are not PPC campaigns where you can set it and forget.
Looking for more help?
If you’re stuck and need help setting up your Google Shopping Ads, we’d be more than happy to help you.
