No matter why you’re leaving BigCommerce for Shopify, switching between the two platforms is an undertaking.
Unfortunately, a quick copy and paste job won’t work. But, a BigCommerce to Shopify migration is easily done when you follow this step-by-step process.
At first glance, comparing BigCommerce vs. Shopify doesn’t yield many differences. The feature sets are highly similar, and the price points are nearly identical.
Shopify pricing ranges from $39 to $399 a month. BigCommerce pricing ranges from $39 to $399. Both platforms offer a free trial. You can get a 10% discount with a Shopify annual plan, or a 20% discount for a two-year plan. BigCommerce offers a 25% discount for annual plans.
The real difference lies in their target audience. The Shopify platform is better suited toward smaller boutique stores and dropshipping businesses. The BigCommerce platform, on the other hand, is geared toward larger brands and online stores.
There’s no easy copy and paste migration solution because the underlying architecture that supports the software as a service (SaaS) solution is different.
Ways to Migrate from BigCommerce to Shopify

There are three ways to approach migrating from BigCommerce to Shopify. Which one you should use depends on how much time, money, and technical skills you have. If you don’t have the funds to hire someone to do it for you or pay for an automated app, then you’ll have to use the manual method we outline here.
Hire Someone to Help You
You can hire a professional or an agency to assist you with the migration. They’ll review your technical requirements and then get the data from BigCommerce and install it in your Shopify account.
You won’t have to spend time doing it yourself, and if they run into any technical issues, it will be up to them to fix them.
This approach, however, could become quite expensive. Most web development agencies will charge hundreds to thousands of dollars for the service. Your quote will depend on the size of your store and how quickly you need the project completed.
Use a Migration Tool
Several tools make it possible to migrate between ecommerce platforms. Using a platform like Cart2Cart can make the migration process easy since it automates everything. For as little as $29, you can have the tool handle everything for you. But, if you want the tool to take care of your 301 redirects from BitCommerce to Shopify, you’ll pay another $59.
However, the good thing is that you can sign up and set up the migration for free. You use a migration wizard to set things up. If you want to see how it works before starting the process with your store, you can use the free demo migration. After about 30 minutes, the whole thing is done, and you can review the target store sample to determine it’s what you expect it to be.
Beyond Cart2Cart, you can also use:
- LitExtension
- Matrixify App (formerly Excelify)
Manual Migration
Even if you don’t have a lot of technical expertise, you can easily migrate from BigCommerce to Shopify on your own. The migration process only takes a couple of hours.
The bulk of this time goes to reviewing the data after importing it to the Shopify platform. It only takes a few minutes to download all the CSV files from BigCommerce and upload them to Shopify.
Step 1: Sign up for Your Shopify Account

Before beginning the BigCommerce to Shopify migration process, you must first create your Shopify account. When you sign up, you’ll have a 14-day free trial. You must provide your billing information to remove the password protection from your store and start processing sales.
You’ll fill out some information about your store, such as your industry and revenue. It’s okay if you’re just getting started. The final step is providing a billing address and indicating whether or not this is a registered business.
At this point, you’ll want to use the assigned subdomain. Adding your domain will stop your BigCommerce store from functioning correctly during the transition.
Configure Basic Administrative Settings
Before gathering the files you need to import, take a few moments to complete the initial store setup, including shipping settings, tax settings, staff accounts, etc.
Step 2: Export BigCommerce Data
Once you’ve created your Shopify account, you’ll need to gather the data from BigCommerce.
Product Data
From your BigCommerce dashboard:
- Go to Products > Export.
- Select the Default Export Template and File Format options.
- A dialog box will appear. Click Export my products to a CSV file. Close the dialog box. The CSV file will download to your computer.
- Now, go back to the Export Template and File Format Options. Select Bulk Edit and click Continue.
- Click Export My Products to a CSV file, then click Close. Another CSV file that contains additional product details and variant data will download to your computer.
Customer Data
From your BigCommerce dashboard:
- Go to Customers > Export.
- Select the Default Export Template and File Format options.
- A dialog box will appear. Click Export my customers to a CSV file. Close the dialog box. The CSV file will download to your computer.
Note: You can’t migrate customer passwords because of encryption. Customers will have to reset passwords and activate their accounts. Shopify Plus users can use the Bulk Account Inviter tool to send customers an email to prompt them to reset their password and create their accounts.
Order Data
From your BigCommerce dashboard:
- Go to Orders > Export.
- Select the Default Export Template and File Format options.
- A dialog box will appear. Click Export my orders to a CSV file. Close the dialog box. The CSV file will download to your computer.
Step 3: Import BigCommerce Store Data to Shopify Store
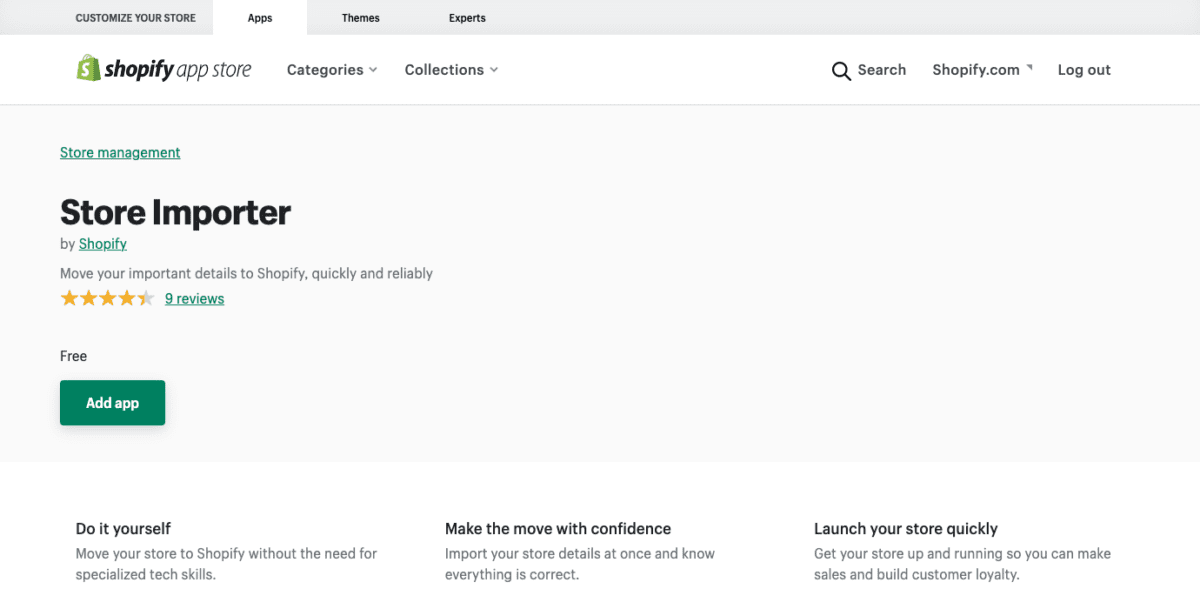
After you’ve downloaded the CSV files you need from BigCommerce, it’s time to import data into your Shopify Store. The easiest way to do this is to use the Store Importer app from the Shopify App Store.

From your Shopify Admin panel:
- Go to Apps > Store Importer.
- On the Import your data into Shopify page, choose BigCommerce from the drop-down menu.
- Under Upload files, click Add file and choose the exported files. You can choose as many files as you need.
- Click Continue Import > Import.
Notes: When you import product data, make sure you add both the default and bulk edit templates to allow for proper data import.
If you find that the Store Importer page has selected the wrong platform, scroll to the bottom of the page. Click Select a different platform, then choose BigCommerce from the drop-down menu.
Step 4: Preview and Audit Content for Accuracy
If the data import was successful, all your product, customer, and order data is available in the Shopify dashboard.
Review the data to make sure everything imported correctly. You can add them manually if you find that specific orders, customers, or products haven’t imported properly.
Orders imported from BigCommerce or any other ecommerce platform are only migrated for historical purposes. The orders are automatically set to Archived status. It’s possible to unarchive them, but you won’t be able to perform tasks on those orders like you would with Shopify orders.
Step 5: Manually Add Data if Necessary
If you find that your import left out some information, you’ll want to add any missing data manually.
Importing a Second Time (If You Find Errors)
If you missed something in your first import, you can import store data again on top of the existing import. Click Start new import.
If the previous import includes customer data, then the customers are updated. They’re matched by email address and then telephone number if an email address is unavailable. When matches are found, records are updated accordingly.
- Marketing subscriptions and tax-exempt statuses are overwritten.
- Notes, addresses, and tags from the import are added.
- If the existing record has empty first name, last name, or telephone fields, but the information is in the imported record, it will be updated to include the information.
If your new import data contains products already in your Shopify store, the new import skips them. You’ll see a list of skipped products in the import summary after the import completes.
Manually Add Products
To manually add products to your Shopify store from your desktop:
- Go to your Shopify dashboard and navigate to Products.
- From that page, click Add product.
- Enter your product title, description, and additional information.
- Click Save.
The process is similar on the Android and iPhone apps.
Manually Add Customers
To manually add customers to your Shopify store from your desktop:
- Go to your Shopify dashboard and navigate to Customers.
- From that page, click Add customer.
- Enter your customer information. If the customer has agreed to receive marketing email and you have their email address, check the Customer agreed to receive marketing emails box in the Customer Overview section.
- In the Tax Exemptions section, check Collect tax for customers where you charge sales tax. If the customer lives in Canada and is tax-exempt, click Browse or search exemptions and select all the tax exemptions that apply.
- Click Save.
The process is similar on the Android and iPhone apps.
Step 6: Design Elements and Finishing Touches
Once the information is imported, reviewed, and corrected as needed, it’s time to ensure all the design elements are in place.
You can use one of the free themes in the Shopify Theme Marketplace or pay for a premium one. If you can’t find anything that works for you, there’s always the option of having a custom theme built, but this can get expensive quickly.
Step 7: Connect Your Domain to Your Shopify Store
After you’ve confirmed and reviewed the imported data, you can connect your domain to Shopify. Once connected, your customers will go to your Shopify store rather than your BigCommerce one. Until you add your domain, your customers will only access the new store with the Shopify store URL, which looks like this: subdomain.shopify.com.
From your Shopify admin panel:
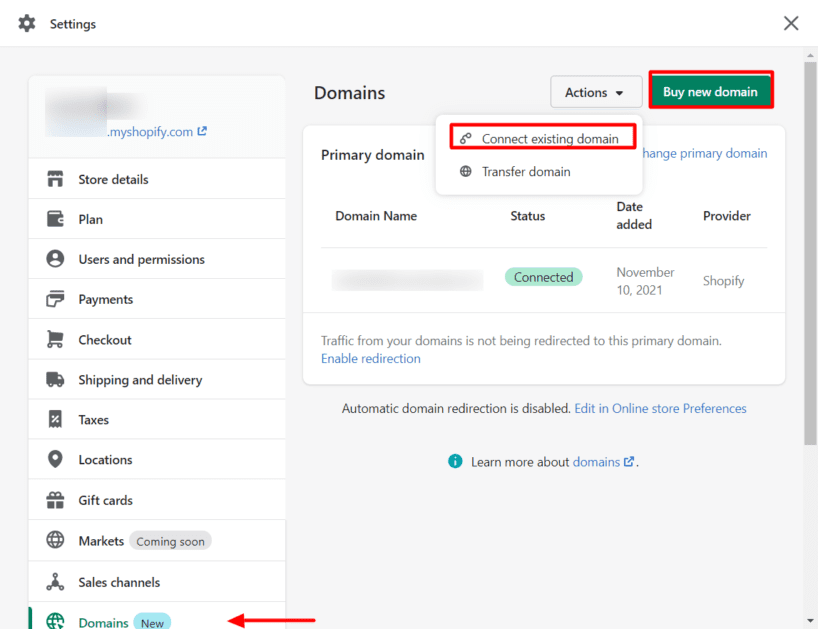
Go to Settings > Domains.
Click Connect Existing Domain. If you don’t see this, click Actions, then Connect Existing Domain.

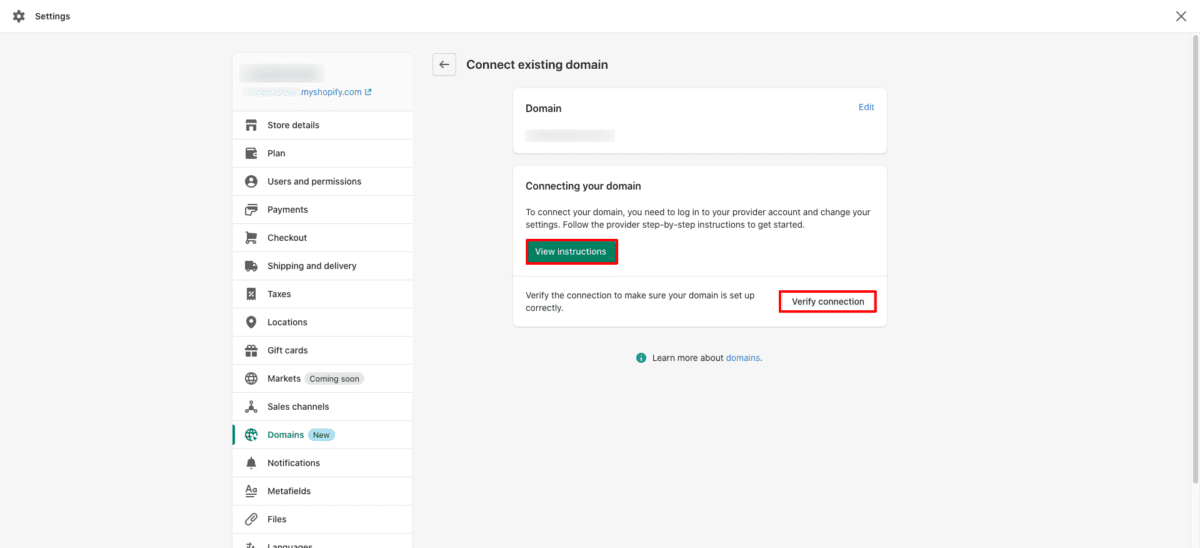
Click View Instructions. This will guide you by pointing your domain to your Shopify account since the instructions vary slightly depending on your domain registrar.

Follow the instructions with your domain registrar, and return to Shopify to verify the connection. It may take up to 48 hours for the process to complete. If you’re still having issues after 48 hours, contact your domain registrar for help.
Alternatively, you can transfer your domain to Shopify if you want to manage your domain from within your Shopify admin.
After the domain is attached, if you couldn’t use the same URL structure across all your pages and products, you’ll need to set up 301 redirects. This tells Google that the old BigCommerce URL should forward to the new Shopify URL. This step is crucial to ensuring you don’t lose any search engine rankings.
In your Shopify dashboard, visit Online Store > Navigation. Look for URL Redirects. This will allow you to redirect your BigCommerce URLs to the new Shopify ones. Using an app like Easy Redirects will save time if you have a large site.
Troubleshooting Your BigCommerce to Shopify Migration
In a perfect world, your store import will run smoothly. However, some users may have issues with transferring data from BigCommerce to their new online store.
Common Import Issues
After the data transfer is complete, you’ll see an import summary page with details. Here’s what these messages mean and what to do to solve the issues.
Some products, customers, or orders failed to import
If you find this happens, you can manually add what’s missing. Keep in mind that if you have multiple customers with the same email address or phone number, those will not be part of the import. If two more customers have the same email or phone, then you’ll only see the most recent customer entry.
Products imported successfully but aren’t published
If you had any BigCommerce products hidden when you exported all the data, the products are imported to the target store as hidden. Make it available for your chosen sales channels if you want to publish the product.
Product variants failed to import
If your product has variants and one is missing an option, the product won’t be imported. You’ll need to add the product manually.
For example, if you sell necklaces in various lengths and colors, each product needs information for both the length and the color. If one of the variants includes color information but not length, the product won’t import.
Imported products no longer have their dimensions
If you need to add product dimensions for your customers, add the information directly to the product description.
Tags applied to imported records
The Store Importer app automatically adds tags to imported records. It adds tags to make it easier to find things you’ve imported so you can review them and make edits where necessary.
The tags vary based on the platform you’re importing data from. If you use tags to organize your store, these tags may create issues. Your customers may see these tags. To relieve this issue, remove the tags after you’ve reviewed the imported records.
Deleting a Data Import
If you’re unhappy with the data transfer, you can delete it. If your import contains many failed items, it may save time to remove the import and try again.
It’s only possible to delete the most recent import. You must wait for the data to completely delete before starting another import.
- On the “Import Complete” page, click “Delete import.”
- On the dialog box that appears, click “Delete import.”
- Once the imported files are deleted, click “Start new import” to start another import.
If you’re ready to move from BigCommerce to Shopify ecommerce platform, you’ll need to do a little prep work before you get started. Check all your store data to make sure it’s filled out as completely as possible before starting the export process.
Once everything is transferred over, spend time looking over everything at your new online store. Double-check SEO URLs for all pages. Review page titles and meta descriptions. Check that all images are in place and links work accordingly.


