You’ve decided what kind of ecommerce business you’re going to run. You’ve done your homework and chosen Shopify as the ecommerce platform you’ll use. Now? Your head’s swimming with a ton of things to be done before your grand opening.
Fear not! We’ve developed this Shopify launch checklist to help you make sure you miss nothing before your big day.
Why Use a Shopify Launch Checklist
Even if you’ve already spent hours building your store and loading up your products, there’s a ton of moving parts to launch an ecommerce store. Without a checklist to help you, it’s easy to forget something. And if you launch but forget a critical step, you could cost yourself revenue.

A Shopify pre-launch checklist helps to make sure you don’t miss any crucial steps, streamlines your workflow, and keeps you accountable. Here, we break things down into 15 steps so you can start making sales. (This list assumes you’ve already selected your Shopify store theme and have your content and products ready to go. If you’re not quite there yet, here’s how to set up a Shopify store.)
Step 1: Start with Your Sales Channels
Sure, a Shopify store is a great thing, but your website isn’t the only place people will shop online. And when you’re just getting started, you won’t have the search engine optimization (SEO) “juice” to rank your website higher than the competition. That’s just one of the many reasons you should consider a multi-channel sales strategy. You can bring in customers from many places online and centralize everything within your Shopify dashboard.
Spend some time figuring out where your customers are, then add those sales channels to your Shopify store. Options include:
- Amazon
- Buy Buttons and checkout links
- eBay
- Facebook Shop
- Google Shopping
- Messenger
When you connect your sales channels to your dashboard, you’ll have all your orders, customers, and products in one place for easy management.
Step 2: Add Your Custom Domain
A custom domain is essential for branding. What’s easier to remember? EcommerceCEO.com or EcommerceCEO.Shopify.com? (We don’t have a Shopify store, but the point remains.)
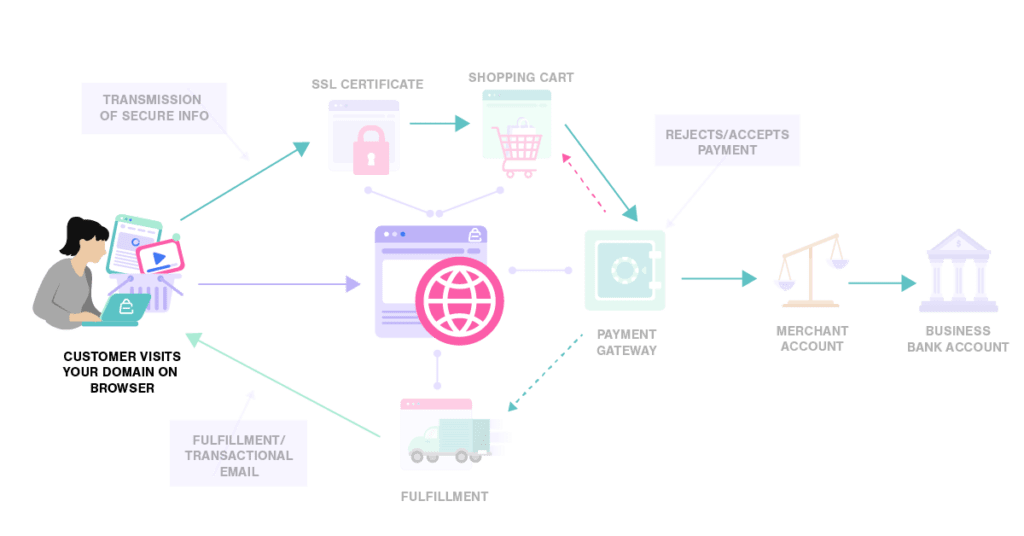
If you’ve already chosen your business name, you’ll want to do a quick search to make sure the domain name is available. You should also make sure there’s no trademark on your name.
If for any reason your ideal domain name isn’t available, don’t panic. Try some variations. Add a word related to your brand in front of it, or get creative with the top-level domain (TLD) you use.
If you’re a clothing brand, try adding “wear” in front of your brand name. If you’re a coffee brand, try a .coffee domain name. You can also try a .store or .shop TLD. SEO tool Topic uses the domain name UseTopic.com and has done well.
Once you’ve found a domain name that works with your brand, is trademark-free, and is available for purchase, you can buy it with Shopify and link it to your account. If you’ve already got a domain you want to use, you can add to it your Shopify store.
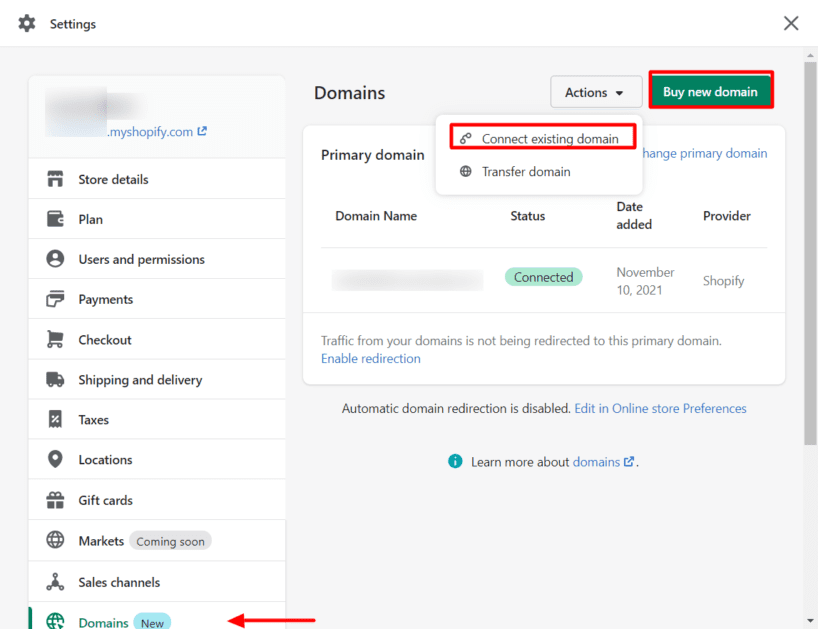
Image Credit: Shopify
Step 3: Assess Your Checkout Experience
Before you drive traffic to your Shopify store, you want to make sure that potential customers will be able to complete the checkout process. Research shows the average cart abandonment rate is 69.8%. That means that on average, 7 out of 10 people will leave your store without ever making a purchase.
The best thing you can do as an ecommerce entrepreneur is to preview your checkout process and remove as much friction as possible. Make it easy and keep it as informative as possible. Things to check for include:
- Displaying shipping rates during checkout
- Discount codes can be applied (and work as they should) in the cart
- Shoppers have the option to edit their carts
- Familiar (trusted) payment methods are available, and customers can choose the one they want to use
- Order status tracking option
- Easily accessible contact page in case edits to the order are needed
- Email confirmation of order receipt/purchase confirmation
- Clear shipping policies for international sales
- Language and currency conversion options for international sales
If you use the Shopify Payments option, you can place test orders on your site with the live gateway to ensure everything runs smoothly.
Step 4: Check Payment Settings
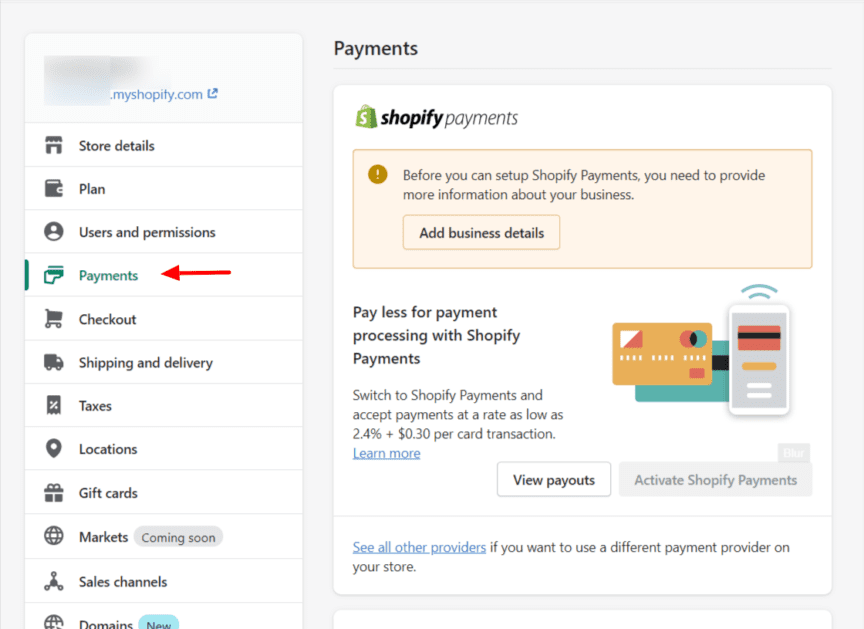
Image Credit: Shopify
Check that your shipping and financial settings are what you expect them to be. Shopify works with more than 100 payment gateways – and you need to make sure your account is properly configured to work with the ones you choose. Make sure your payment gateway accounts are set up properly so that payments can transfer to your bank account at your chosen interval.
Step 5: Build Standard Website Pages
Before you launch your online store, you need to have a few pages people can read to learn more about your company. Research shows consumers have product-related concerns, customer-related concerns, and societal-related concerns. The most common reasons people trust a brand have to do with the products themselves and their quality (88%), while good ratings and reviews also play a role (63%.) A little over half of consumers say brands that treat customers well earn their trust. Over a third of consumers say that how a company treats its employees affects their trust.
With this data in mind, make sure you have, at a minimum, the following standard pages on your website, complete with content:
- Homepage: Definitely the most important part of your site, this is the page that sets the tone for the overall experience. And unfortunately, no matter how awesome your brand is, some people may not make it past that homepage. Make it count – first impressions are hard to beat. Keep navigation clear so people can move from page to page with ease.
- About Page: Here’s where you fill people in on the company’s background, the brand, and the people behind the scenes. A lot of store owners don’t worry about this page, but when done correctly, you can use it as an effective sales tool. Your about page is the chance to assure customers your store is real, so they can invest in your brand over the long term. Many people also want to shop with businesses that have similar values, so when you share your mission and company values, you can connect with new customers who support similar causes.
- Contact Page: This helps people see you’re an actual business, so it’s not something to skimp on. Include your phone number, email address, and, if you have one, your retail store address. Add social media accounts, too. Include a contact form so people can reach out to you without ever having to leave the page. If you have multiple points of contact, include information about who people should contact for the most common issues. For instance, general inquiries, press, wholesale, etc.
- Frequently Asked Questions (FAQs): You may not know which questions customers will ask the most when you launch, but you can get a good idea of what you should answer by looking at what the competition shares. And you can safely bet that people will have questions about your shipping and return policies, along with how to get in touch with you. If you end up with a lot of info on your FAQ page, add a search box to make it easier for users.
- Store Policies Page(s): Before shopping with you, people may want to know about your shipping policy and return/refund policy. Having these on an easy-to-find page (or on their own individual pages) is a great way for people to get the answers they’re looking for without needing to reach out to you. (Did you know 39% of people would rather clean a toilet than sit on hold with customer service?)
Step 6: Verify Your Email Notification Settings
Email is a crucial part of your store operations – from marketing to communicating one-on-one with your customers.
Before you launch, take time to set up the email notifications so they match the rest of your branding. Visit Settings > Notifications to make edits to your email templates. Upload your logo, change colors, edit the messaging, etc. as you see fit.
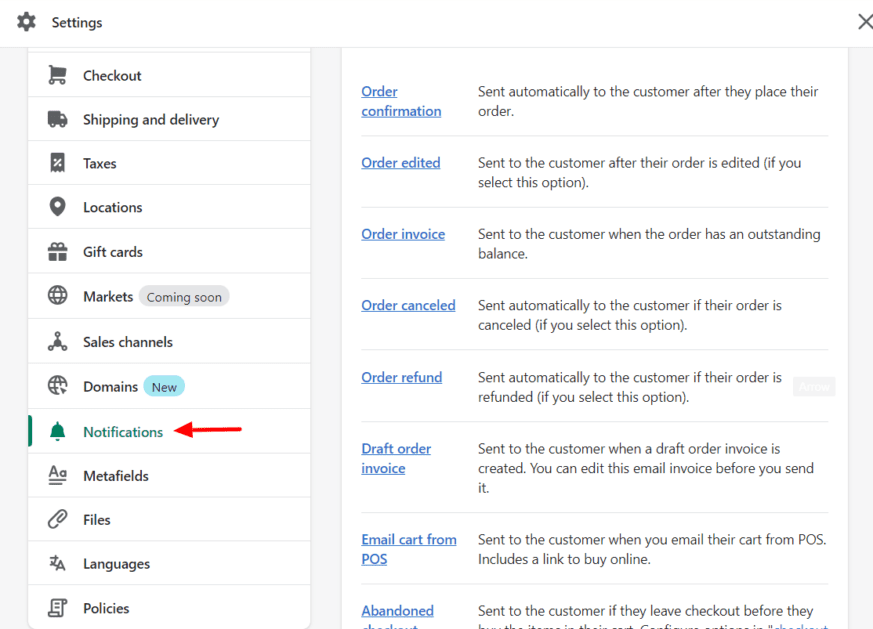
Image Credit: Shopify
Notification emails include:
- Order emails: Confirmation, Edited, Canceled, Refunded, Draft Order Invoice, Email Cart from POS, Abandoned Checkout, POS Exchange Receipt, Gift Card Created, Payment Error
- Shipping emails: Confirmation, Update, Out for Delivery, Delivered
- Local pickup and delivery emails: Ready for Pickup, Picked Up, Out for Delivery, Delivered, Missed Delivery
- Customer emails: Account Information, Account Welcome, Password Reset, Contact Customer
Step 7: Run a Content Audit
When you’re close to the work, it’s difficult to spot minor errors, particularly when it comes to spelling and grammar, and broken links. Look at each piece of your content at least a few hours after you upload it, so you have fresh eyes.
Work from the bottom up – starting with the last paragraph – because the errors are more likely to jump out at you.
When creating your copy, consistency is key. Choose your editorial style guide (will you, or won’t you use the Oxford comma?) and stick to it. If your brand allows for a little creative freedom with spelling and coming up with your own words (Etsy, Pinterest, and Groupon are all made-up words that have become household names!) embrace it when and where it is most appropriate.
Don’t forget the technical side. Click all the links to make sure they work, and if you find any broken ones, correct the URLs.
View your site on multiple devices to ensure all the images render correctly and the mobile responsiveness works correctly. Check your site across multiple browsers to make sure it displays the way you intend and there aren’t any browser-specific errors to solve ahead of the launch.
Step 8: Conduct Content Optimization
If you’ve got images or videos on your site, optimization is a crucial step. Slow-loading images cause the user experience to suffer. When that happens too often, Google won’t be too keen on ranking your site high in the search results.
SEO audit tools and website graders can help you make sure your content is optimized.
But it’s not just about speed optimization (read: compression and hosting your videos on YouTube or Vimeo.)
You should:
- Name your files with descriptors. Ideally, describe what’s in the image and use the keywords you’re trying to rank for when they make sense.
- Fill in image ALT attributes for all images. This isn’t just for SEO, it’s also for web accessibility. Using keywords is important, but like with file names, aim to describe what’s in the image – that’s what screen readers use to show those with low or no vision what’s on the screen.
- Pay attention to file size. You may have a 3000×3000 pixel image that’s suitable for printing, but you don’t need to upload a file that big for thumbnails that are only 50×50. The bigger the file, the longer it takes to load.
- Use the right file types. Certain file types are better for web use than others. JPG is recommended for photography, while PNG is the ideal option for icons and graphics.
- Test everything. Running split-tests, also known as A/B tests, can help you see what’s working and what’s not. Try some contextual images and some with a white background. See what your audience responds to best.
Step 9: Install Analytics Tools
Analytics are key to seeing what your audience is doing while browsing your website. Your Shopify store will have its own analytics reporting tools in the dashboard, but installing a third-party tool like Google Analytics or Adobe Analytics can give you even more information.
Step 10: Build Your Prelaunch Marketing Plan
Websites aren’t “If you build it, they will come.” After your launch, make sure people know about it. Building your marketing plan ahead of time is always a good idea.
When you craft a marketing plan, the execution becomes as simple as following a checklist like this one.
Step 11: Verify Tax and Shipping Settings
Make sure your tax and shipping settings are appropriately matched for the items you’re selling. If they’re off, you could cost yourself profit since you’re not charging enough. Double-checking these settings ensure that you’re charging enough. This is especially important if the nature of your business and your customers’ location dictate that you need to charge (and pay) sales tax.
If you’re unsure about the correct tax settings, consult an accountant who’s familiar with taxes in your local area.
Step 12: Ensure Visitors Can Contact You
Yeah, so we’ve already covered how important is to have your contact page set up, but it’s not the only place where your contact information should be listed on your website. Include your contact info on the footer of your website so that no matter where they are, they can access the information they need to get in touch.
Place a live chat option on most pages of your website, so people can reach sales or customer support the moment they have a question or concern. Why? Because according to Forrester, 50% of adults will abandon a purchase if they can’t get a quick answer to their question. Want more sales via your ecommerce website? Quick and easy contact methods are one way to make it happen.
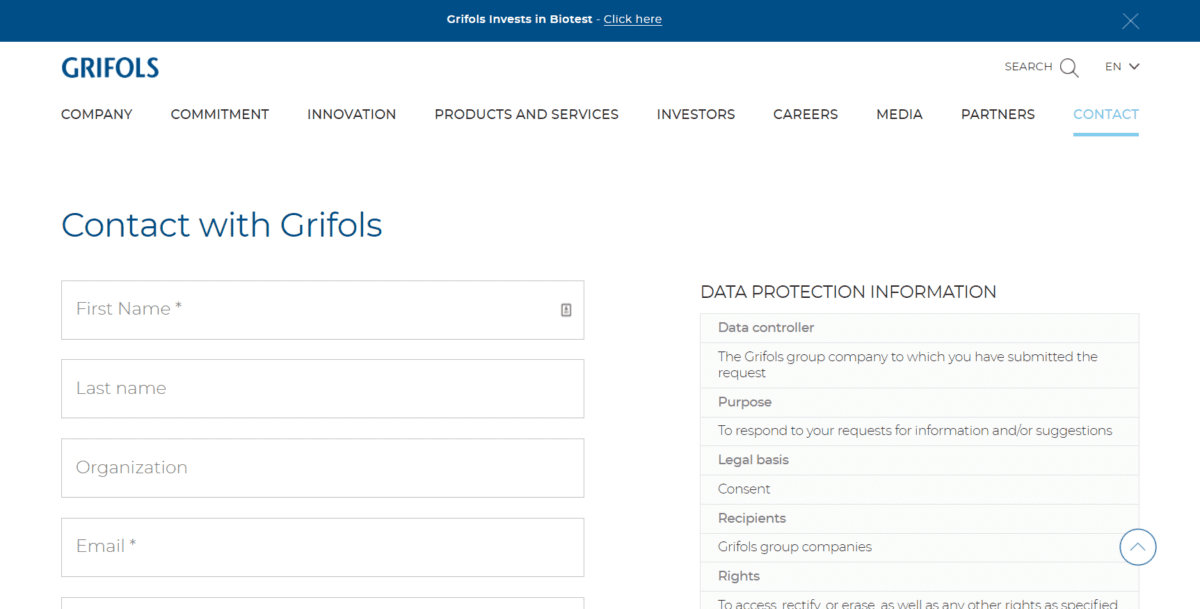
Global healthcare company Grifols has an excellent Contact Page. There’s and address and telephone number for the main international office, along with a map. Then, there’s a contact form.
Step 13: Install Apps
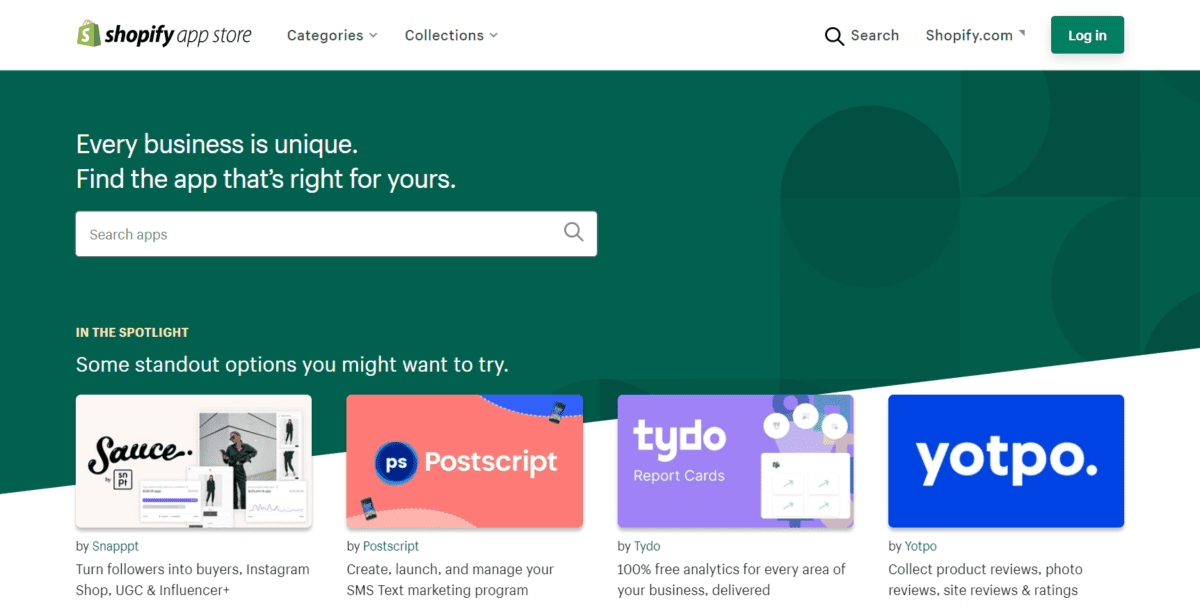
Image Credit: Shopify
You won’t find a shortage of apps in the Shopify App Store, but you should still resist the temptation to install a bunch of them. While many are free, several have recurring monthly expenses that will add up quickly. Not only that, but the more apps you run, the slower your site could be to load. Each app requires resources to run, so by installing only the essential apps, you keep your online store running as smoothly as possible. Check out this list of the best Shopify apps for inspiration.
Step 14: Set up Billing Information
Before the end of your free trial, you’ll need to choose your plan and make sure you have your billing information in the system. If you reach the end of your trial without this information, you won’t be able to accept or process orders.
Step 15: Launch Your Online Store
The final pre-launch item is to, of course, launch your Shopify store. That means removing the password-protection that is default on all brand new accounts, giving everything a final once over to check for errors – and then announcing that you’re open for business. You’ll also want to remove the powered by Shopify branding.
Follow Our Shopify Checklist
Launching your store is a lot of work, but with this Shopify store launch checklist, the job will be a lot easier to manage.


