Whether you’re a Wix user who’s decided to migrate to Shopify, or simply own a domain you purchased from Wix and want to move it to Shopify before building your store, this is the guide for you.

Here’s a step-by-step guide for how to transfer a Wix domain to Shopify so you can move your ecommerce store from one platform to the other.
Wix vs. Shopify
Before we dive into the transfer process, let’s look at a quick comparison of Wix vs. Shopify. Both are great ecommerce platforms, but can’t be the perfect ecommerce solution for everyone.
Both Wix and Shopify are hosted platforms, targeted at those with little to no design experience. You don’t have to know coding and technology to build an effective website with either website builder. Wix added ecommerce functionality after the fact, while Shopify had it built-into the platform right away.
Wix pricing ranges from $27 to $59/month, depending on the plan you choose. Marketing features, like abandoned cart recovery, are included in even the basic ecommerce plan. That said, there are storage space and product limitations.
Shopify pricing ranges from $39 to $399/month, depending on the plan you choose. Many marketing features, like smart product search and subscription billing, require third-party apps, which cost you more money every month.
Should You Switch from Wix to Shopify?
BuiltWith data shows Shopify accounts for 27% of all ecommerce websites online today, while Wix accounts for 12%.
Wix is an ideal option for many online shops, but it’s not right for all business models. Wix is better suited to stores that are just starting out, while a Shopify store may be more beneficial for an established store that has outgrown the Wix platform.
Shopify is far more scalable, so if you find that you’re reaching the upper limit of your Wix plan and aren’t ready to pay for their enterprise level pricing at $500+, then investing in Shopify makes sense.
Before Getting Started
Before you transfer your domain, you’ll need to check to be sure it’s eligible for transfer. If you’re using a co.uk or .ca domain, you can’t transfer it to Shopify – but you can still use it. You’ll just have to manage your domain settings from your current registrar, instead of within the Shopify dashboard.
Remember, your Shopify subscription doesn’t include email hosting. If you want to use email on your custom domain, you’ll need to invest in a third-party provider for email. It can take up to 20 days for the domain transfer to complete, so consider this as you make plans for your online store.
Note: If you purchased your domain within the last 60 days, ICANN rules say that it cannot be transferred to another registrar. You’ll have to connect your domain to Shopify and transfer the domain once you’ve owned it for 60 days. When you transfer it, you’ll also need to pay for another year of ownership (currently priced at $14 per year), which will be added to your total ownership time.
Step 1: Create Shopify Account
Before you get started with transferring a domain from Wix to Shopify, you must first have a Shopify account. You can sign up for a free 14-day trial, but you must have a payment method on file before you can start selling.
Visit Shopify.com and enter your email address to start your free trial. Once you name your store and complete the basic account creation tasks, you’ll need to connect your domain to Shopify.
This step is necessary to avoid service interruptions if you’re already using the domain to host a website. If you skip this, your website visitors may find a broken website during the transfer process.
Why connect your existing domain before you transfer it to Shopify? Connecting it points it to your Shopify URL so that when someone types in your domain, it sends them to your Shopify store.
Connecting Your Domain to Your Shopify Account
Log into Shopify.
Visit Settings > Domains.
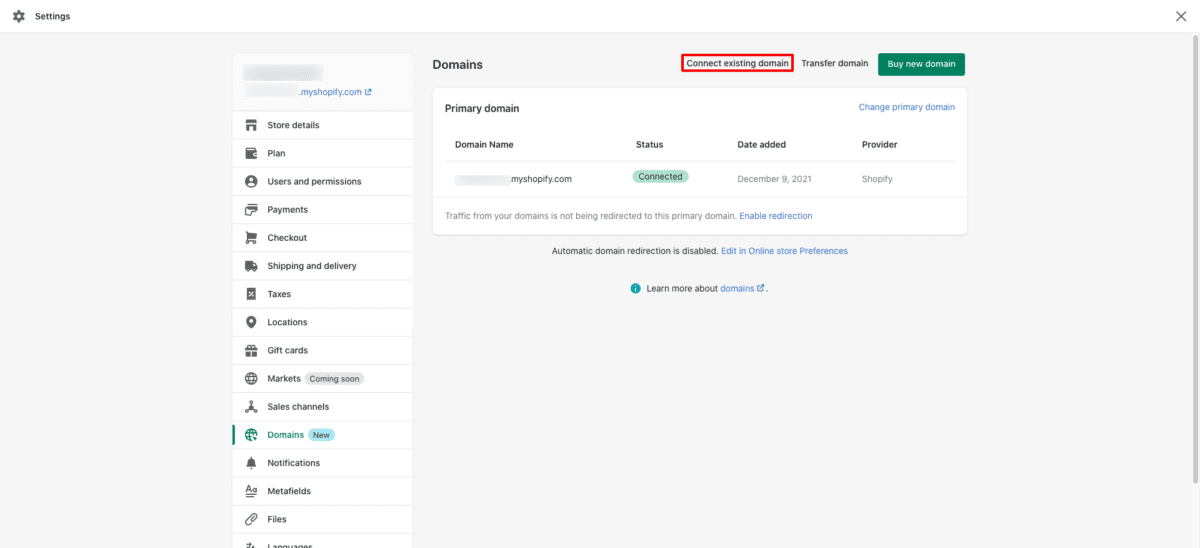
Click Connect Existing Domain. If this option isn’t visible on your screen, click Actions first, then choose the Connect Existing Domain option.
Enter the domain name you’re connecting.
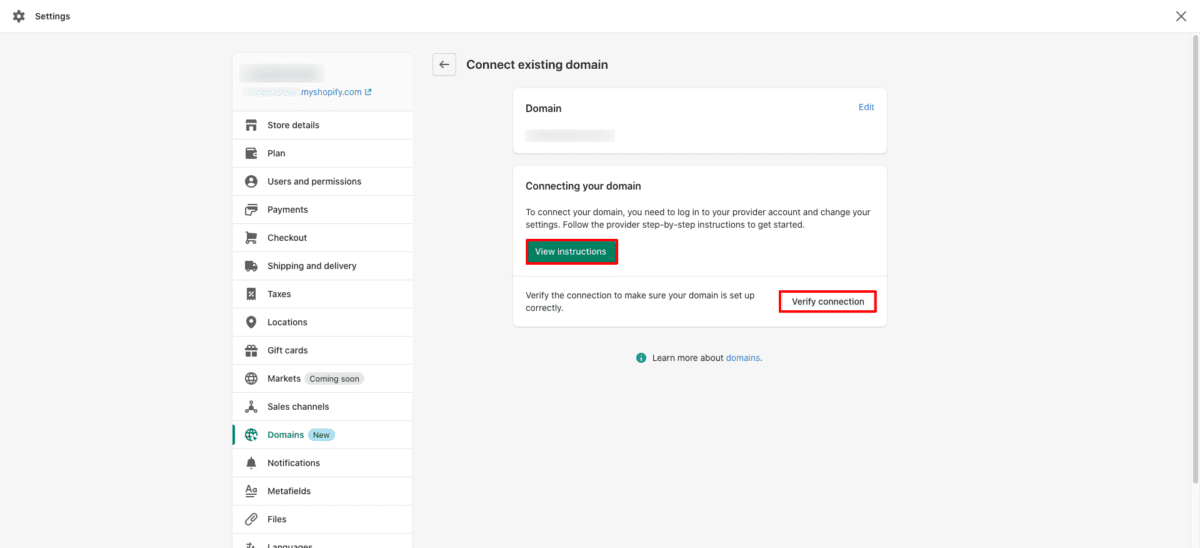
Click View Instructions. This will show you Shopify help guides to help you with the process. Your exact steps will vary depending on the domain registrar you purchased the domain from.
Some registrars may make you change the DNS settings or CNAME record to Shopify’s IP address. Others may require you to change the A record to point the domain to Shopify.
Once you’ve completed the steps to connect your domain, go back to Shopify and click Verify Connection to ensure the process worked. Keep in mind, the connection process can take up to 48 hours.
If the connection doesn’t work after two days, repeat the steps above, checking your domain settings for errors. If you can’t find anything wrong, reach out to your domain registrar for help.
Step 2: Prepare the Transfer
After you’ve connected your domain to Shopify, it’s time to visit Wix to transfer the domain away from the account. (If you first purchased your domain from somewhere other than Wix, you’ll need to visit your domain provider account for these steps. Check your domain provider‘s transfer policy for more information.)
- Login to Wix > My Domains Page and Select Domain
- Advanced > Transfer Away from Wix
- Select EPP Code (also known as authorization code)
You’ll receive the EPP code by email. If everything looks good, specify the Shopify domain transfer route. The migration process is complete within 7 days.
Step 3: Transfer Domain to Shopify
After you’ve confirmed your domain is unlocked, log in to Shopify.
Visit Settings > Domains.
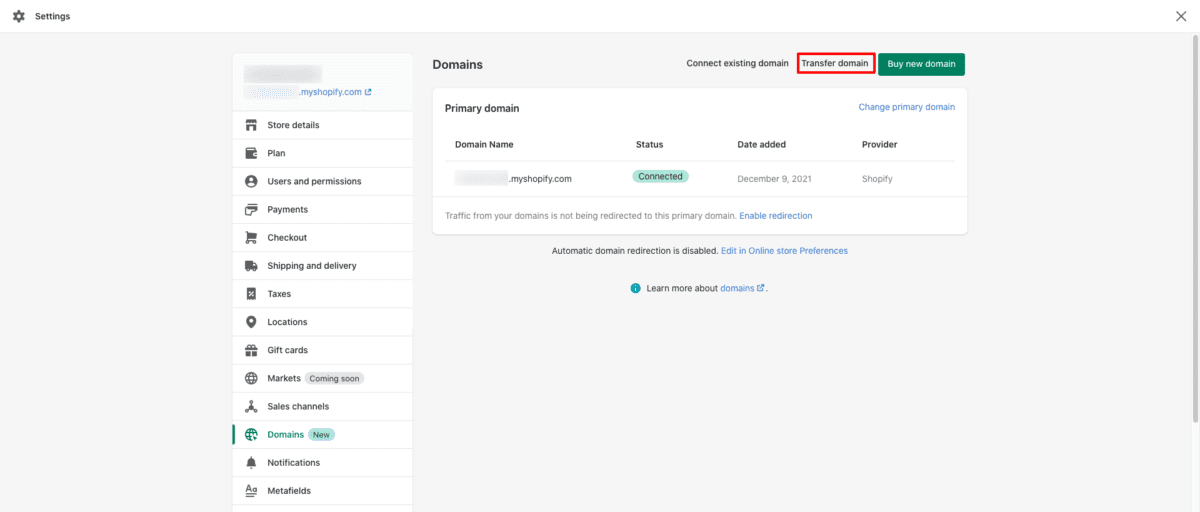
Click Transfer Domain. If you can’t see this option, click Actions then choose the Transfer Domain option.
Enter the domain name you’re transferring.
Enter your payment information to pay the $14 fee to register your domain for another year.
To test the connection, press the Verify domain button. Once the domain status reads unlocked (it may take time to refresh the status, so if you’ve recently completed the steps, try again in a few hours. Keep in mind that it may take up to 48 hours.
Once the domain status is Unlocked, you’ll be able to click Next to continue. If it still reads Domain Locked, you’ll need to go back and verify you’ve completed the Prepare for Transfer steps above correctly to unlock it.
Enter the EPP or authorization code from your domain provider. Click Next to continue.
Click Buy and transfer.
Watch the email account associated with your domain closely. Depending on the registrar, you may need to authorize the transfer before the transfer process can start. You’ll receive an email that has a link to Approve Transfer/Confirm Transfer.
While it can take up to 20 days for the transfer process to complete, it is often done well before then. When it’s finished, Shopify will email you, and you’ll be able to change your domain settings from within the Domain page on your Shopify dashboard.
Note: If for any reason the domain transfer fails, your renewal charge is refunded.
Once the transfer is complete, you’ll also receive an email from Tucows, Inc – the parent company of OpenSRS – the domain registrar Shopify uses – regarding your data use consent preferences.
Once the transfer process is finished, you’ll be able to set up your email hosting, add sub domains, setup forwarding email addresses, add international domains, and setup automatic domain renewal.
Migrating Your Wix Store to Shopify
If you’re ready to move from Wix to Shopify, follow these steps to make the migration process move smoothly.
Backup Wix Database
Before making major changes, it’s always a good idea to back up your Wix web store data, so that if something goes wrong, you can always restore it to its current working state.
Wix has a built-in backup service that makes it easy to back up your information in a few clicks. Any time you change your website, Wix creates a backup automatically, in Site History. If you mess something up, you can select the previous version of your site and restore it quickly.
It’s also possible to duplicate your site any time you want, to create a manual backup. That said, the duplicate copy won’t be updated automatically whenever you change your website.
Customize Shopify Homepage
You can use a free theme from the Shopify theme library, or choose a premium theme from the theme store. If you’re familiar with Shopify or can hire a Shopify developer to edit the templates, you can further customize it to meet your needs. Once you’ve settled on a theme, start customizing the home page as needed to fit your brand.
Create More Pages as Needed
After you’ve built the home page, spend time creating the additional pages you need to fill out your website as it’s designed on Wix. On each of these pages, fill out the required fields, add content and media, and interlink them where appropriate.
Import Wix Data to Shopify
Properly transferring your store data is crucial to ensuring everything runs smoothly on your new Shopify store. You can manually upload your products, content, specs, pricing/cost information, and SEO information like page titles and meta descriptions. This, however, is only practical if you have a few products in your store.
Exporting Wix Data
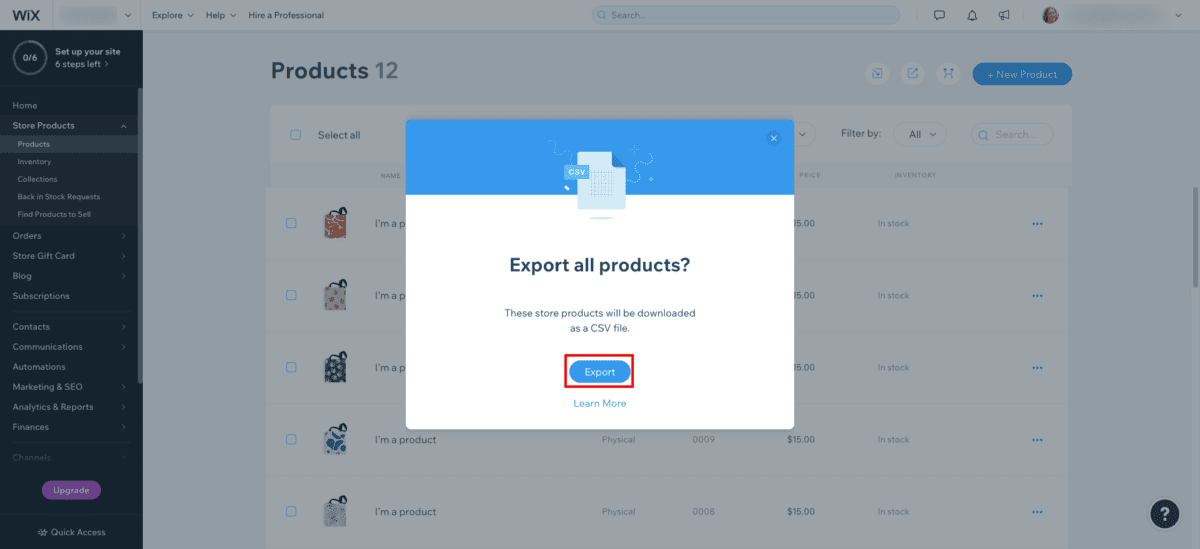
If you’ve got a large volume of products, you’ll need to export your Wix web store data into a CSV file. You can do this from your Wix Dashboard.
From your Wix Dashboard:
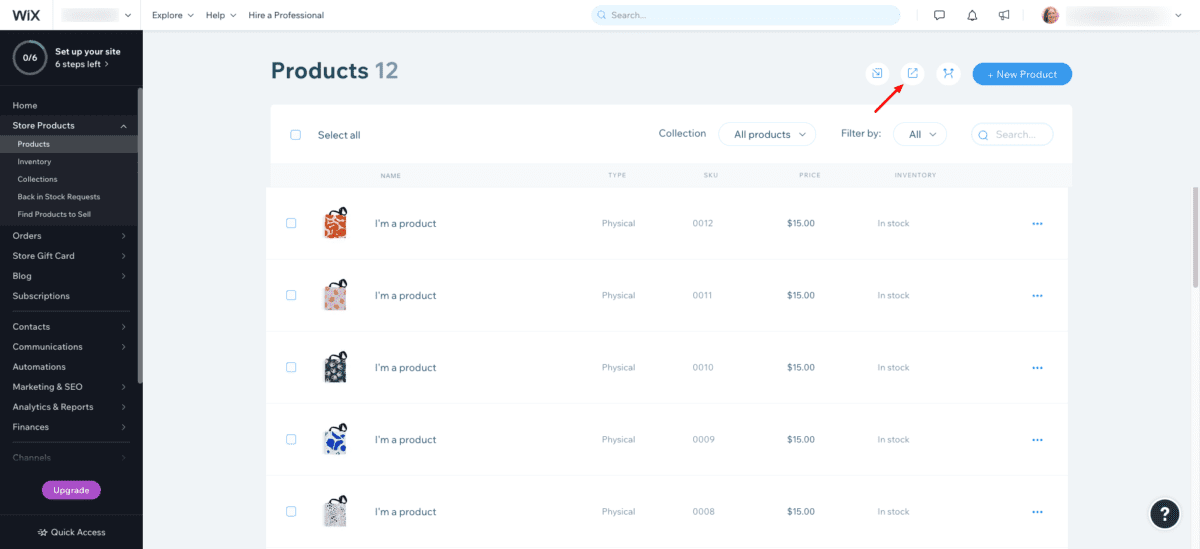
- Click Store Products > Products.
- Next, click the middle icon.
- This will bring up a window that asks you if you want to export your products.
- Click Export to download the CSV file.
You can use the same process to import customer lists, order history, and other website data.
To export your customer lists:
From your Wix Dashboard:
- Click Contacts > Contacts.
- Click More Actions > Export Contacts.
- Choose your export options.
- Click Export.
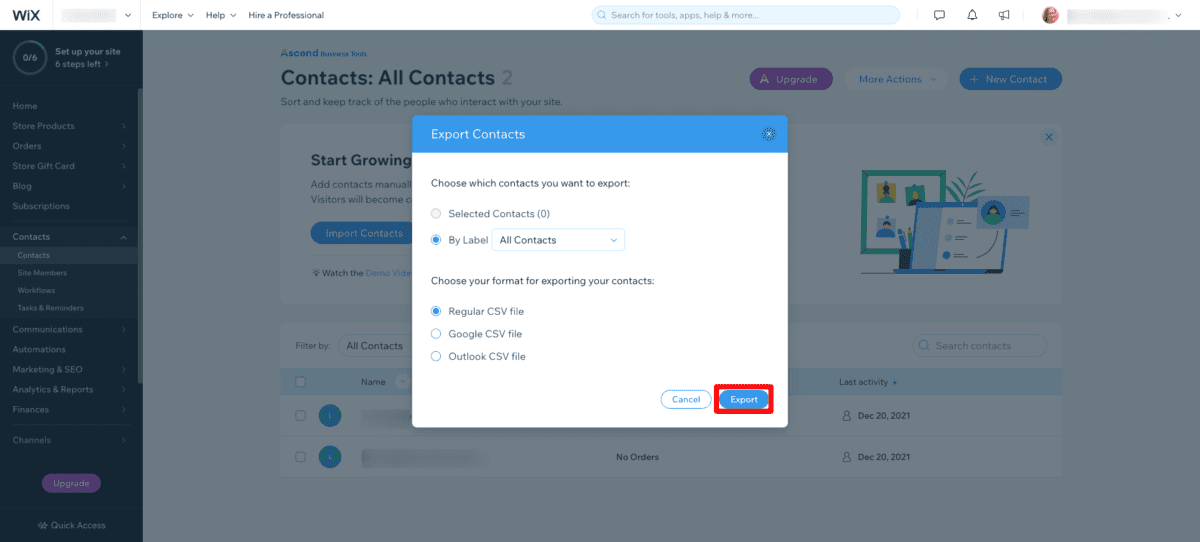
This will give you a list of everyone who has provided their email address.
To export your orders:
From your Wix Dashboard, click Orders > Orders.
Follow the steps above to export.
Importing Data to Your Shopify Store
You’ll then import those files into your Shopify store, starting with products.
From your Shopify Dashboard:
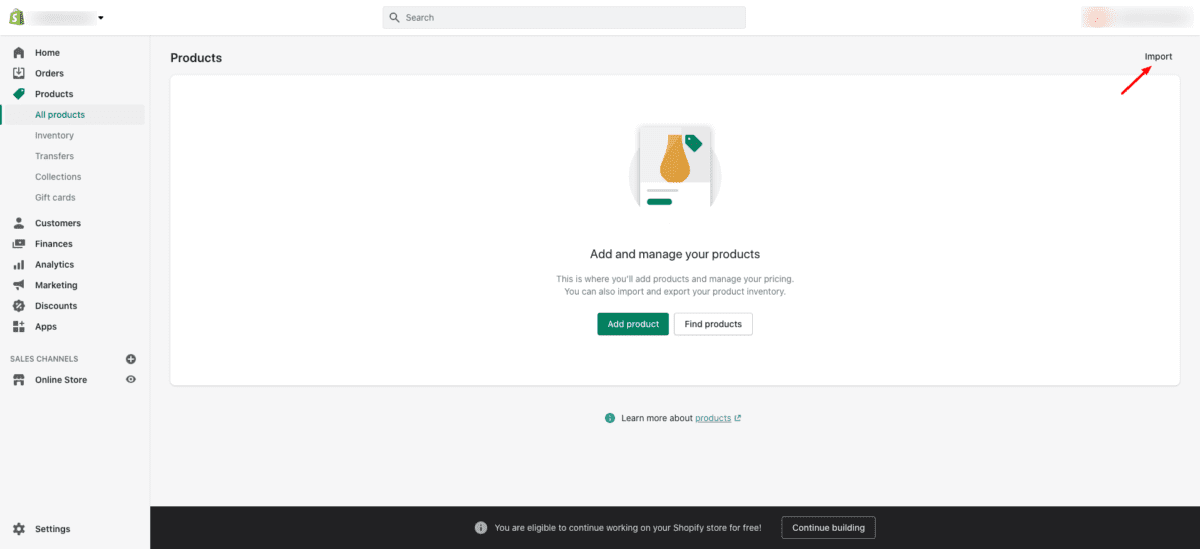
- Click Products.
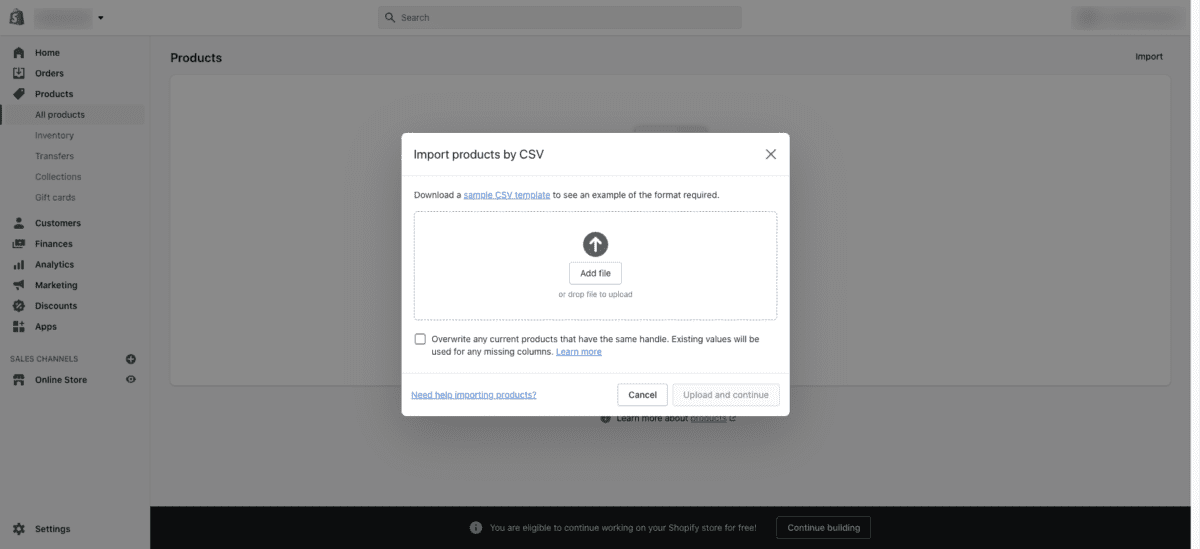
- Click Import in the upper right hand corner.
- Add your Wix products CSV file. Click Upload and continue.
- Check the import for accuracy. Make any required changes manually to ensure everything is as it should be.
Next, import your customers.
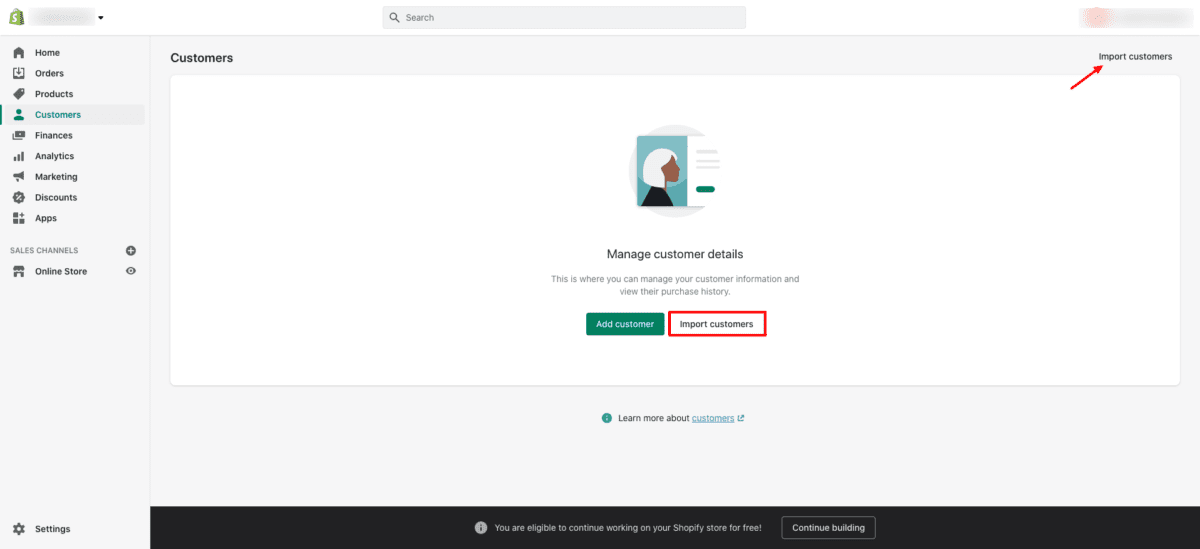
- Click Customers.
- Click the Import customers button, or click Import in the upper right hand corner.
- Add your Wix contacts CSV file. Click Upload and continue.
- Check the import for accuracy. Make any required changes manually to ensure everything is as it should be.
Keep in mind that you cannot export customer account information from Wix, so after the migration to Shopify is complete, you’ll be able to send invitations to your current customers to ask them to create new customer accounts.
Finally, import your orders.
- Click Orders.
- Click the Import orders button, or click Import in the upper right-hand corner.
- Add your Wix orders CSV file. Click Upload and continue.
- Check the import for accuracy. Make any required changes manually to ensure everything is as it should be.
This approach can be complicated and take a while, but when approached systematically, can ensure everything moves from Wix to Shopify easily.
Test the Result
Once you have everything imported, audit the entire site. Ensure all pages have the content they’re supposed to. Test all the links. Review products, orders, customers, etc. to make sure everything is correct.
Pay special attention to your product descriptions and SEO settings. Fill out more detailed descriptions where you see the need to do so. Make sure all product fields are filled out and update any missing ones. If you have a large inventory, use a Shopify app to check product availability and keep track of stock.
Take plenty of breaks to keep your eyes from getting fatigued, as this will make it easier to miss smaller details. Have a friend or colleague review everything before pushing the site and removing your storefront password.
If the idea of manually moving everything is a bit much for you, you can also use a Shopify migration service like Cart2Cart to help you. It however, won’t assist with the domain transfer process.
Ready to Move Your Online Store?
Moving an existing store from Wix to Shopify is time consuming, but often worth it. When you transfer a domain to Shopify, you’ll be able to handle domain management from within your Shopify admin panel. If you cannot transfer the domain because you recently purchased it, you can still connect the domain to Shopify to use it with your store.
Have you migrated from Wix to Shopify before? Are you happy with the result? We’d love to hear from you.


